| Engine Assembly,
continued |
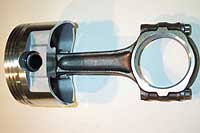
28. With the rods
and pistons mounted up, we're ready to install
the rings. |
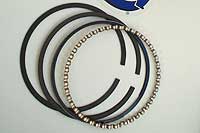
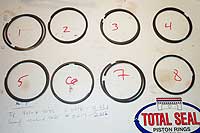
29. We've selected
Total Seals standard moly performance rings (not
the zero gap style). |
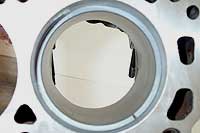
30. The first step
is to check the top ring gap. Install the ring
into the bore. |

31. Use the piston/rod
assembly upside down, to square the rin in the
bore, about 2" down. |

32. Use
feeler guages to determine the gap. We want a
gap of 0.0045" per 4.00 inch bore. So for
this motor it will be 4.030" x 0.0045"
= 0.018-0.020" for the top ring. The second
ring can be a bit tighter (multiply bore x 0.0035").
Because these rings are "file to fit"
we will need to file open the gap to spec. It's
always best to have slightly more gap then too
little. The danger here is that as the motor heats
up and the rings expanad, if the ends of the rings
butt together, serious engine damage will occur.
|
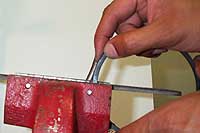
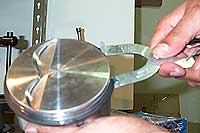
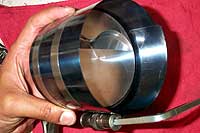
33. Place a flat
file in a vice, and then hold the ring as shown.
Move the ring level, across the file. We only
like to file one side of the gap, and move in
one direction (pull the ring towards your body.)
Re-check the gap every few strokes. |
34. Due to minor
variances in the bore diamter, it's important
to keep the rings organized to the bore you checked
them in.
While only the top ring typically needs to be
file fitted, its important to check the second
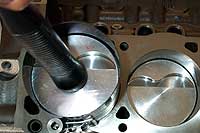
and two oil rails to make sure they are not defective
or butting together. |
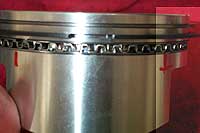
35. Use a ring spreader
tool to install the top and second rings in their
grooves. Follow the manufacturers instructions
for making sure the correct side faces up on the
top and second rings! The oil rail and scraper
are installed by hand. |
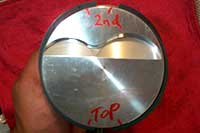
36. Positioning
the ring gaps is very critical. You dont want
all the gaps on top of each other. In this photo
we see the ideal gap positions based on Total
Seals' instructions. The top and second ring grooves
are staggared 180 degrees. |

37. The expander-ring
grove is lined up below the top ring groove. |
38. The two oil
scraper rings are staggered either side of the
second-ring groove. |
39. With the rings
mounted and the grooves positioned properly, the
piston and rod assembly is loaded into a piston
ring compressor. Squirt some oil into the ring
compressor to help the piston and rings slide
out easier. |
40. The piston tool
is carefully squared on top the deck, and then
the back of a hammer is used to knock the piston
down the bore. The piston should slide into the
bore easily, if it stops or hangs up, stop and
pull the assembly and retry. It is very easy to
hang a ring up on the edge of the bore and break
it! |
 41. When the piston
is fully in the cylinder bore, stop and guide
the rod carefully over the crank journal while
continuing to gently knock the piston down.
Be carefull not to nick the polished crank journal
with the rod end.
41. When the piston
is fully in the cylinder bore, stop and guide
the rod carefully over the crank journal while
continuing to gently knock the piston down.
Be carefull not to nick the polished crank journal
with the rod end. |
| |
|


