|
Cam Degreeing
and Checking Piston-to-Valve Clearance
The final test to prove that this combo was 100% viable was
to check piston-to-valve clearance. Let's get it done.
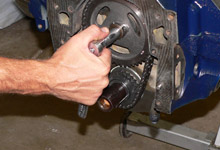
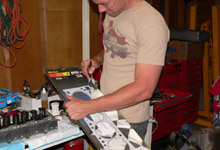
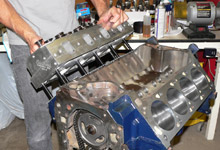
 We started by installing the Comp
Cams Hi-Tech Roller Timing Set for 351C, 351M, and
400.
We started by installing the Comp
Cams Hi-Tech Roller Timing Set for 351C, 351M, and
400. |
|
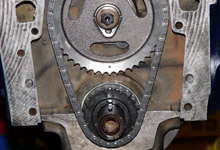
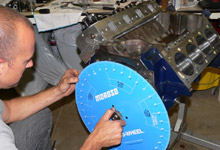
 Comp grinds nearly all of their cams with 4 degrees of
advance. Per the instructions the timing set was installed
"dot over dot" as shown.
Comp grinds nearly all of their cams with 4 degrees of
advance. Per the instructions the timing set was installed
"dot over dot" as shown. |
| |
|
|
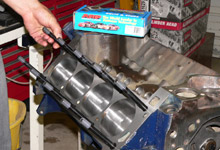
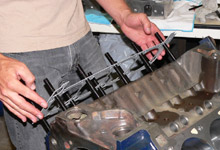
 Next, we once again installed the number one piston and
rod assembly into the number one cylinder.
Next, we once again installed the number one piston and
rod assembly into the number one cylinder. |
|
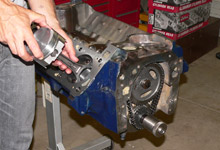
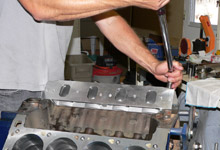
 An ARP cylinder head stud kit would serve to fasten our
Edelbrock 351C heads to the 400. Here they are being installed
finger tight.
An ARP cylinder head stud kit would serve to fasten our
Edelbrock 351C heads to the 400. Here they are being installed
finger tight. |
| |
|
|
 We went with Mr. Gasket Ultra Seal head gaskets.
 |
|
 These Ultra Seal gaskets have a .033" compressed
height.
These Ultra Seal gaskets have a .033" compressed
height. |
| |
|
|
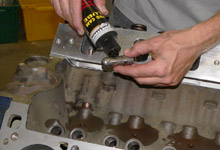
 To measure piston-to-valve clearance we would be using
the test spring and dial indicator method. Here we are
replacing the number one intake and exhaust valve springs.
To measure piston-to-valve clearance we would be using
the test spring and dial indicator method. Here we are
replacing the number one intake and exhaust valve springs. |
|
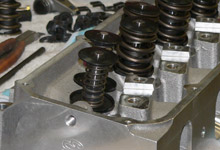
 These are the test springs up close.
 |
| |
|
|
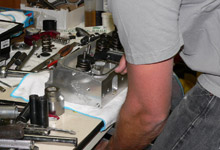
 We slipped the Edelbrock 351C head into place...
 |
|
 ... and torqued it in proper sequence to 90 ft lbs.
 |
| |
|
|
 A spare pair of hydraulic roller lifters stuffed with
washers to make them solid were used to ensure accurate
readings during cam degreeing and checking piston-to-valve
clearance.
A spare pair of hydraulic roller lifters stuffed with
washers to make them solid were used to ensure accurate
readings during cam degreeing and checking piston-to-valve
clearance. |
|
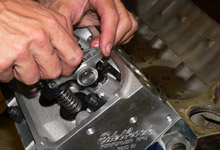
 We had not selected a pushrod yet so we used an adjustable.
With the intake valve fully closed, we installed a rocker
arm to zero lash. The rockers we chose for this build
were the Comp
Cams Pro Magnums for Boss 302, 351C, and 429-460.
PN 1330-16. Yes, their correct for a 400 as well!
We had not selected a pushrod yet so we used an adjustable.
With the intake valve fully closed, we installed a rocker
arm to zero lash. The rockers we chose for this build
were the Comp
Cams Pro Magnums for Boss 302, 351C, and 429-460.
PN 1330-16. Yes, their correct for a 400 as well!
|
| |
|
|
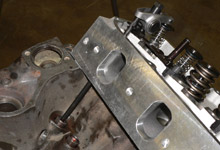
 Here's a shot of the test intake valve train in position
to degree the cam.
Here's a shot of the test intake valve train in position
to degree the cam. |
|
 Using the intake centerline method we confirmed that "dot
over dot" was the correct position. Per the cam card,
the cam phasing checked out with a 106 degree centerline.
You may want to see the FordMuscle article "Dude,
Don't be Retarded" for more info on cam degreeing.
Using the intake centerline method we confirmed that "dot
over dot" was the correct position. Per the cam card,
the cam phasing checked out with a 106 degree centerline.
You may want to see the FordMuscle article "Dude,
Don't be Retarded" for more info on cam degreeing. |
| |
|
|
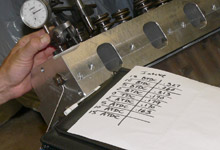
 With the cam degreed, we moved on to checking piston-to-valve
clearance. Starting with the crank at 15 degrees before
TDC of the exhaust stroke, we took measurements for both
the intake and exhaust valve in increments. By depressing
the rocker downward until it touched the piston we verified
plenty of clearance up to 15 degrees ATDC.
With the cam degreed, we moved on to checking piston-to-valve
clearance. Starting with the crank at 15 degrees before
TDC of the exhaust stroke, we took measurements for both
the intake and exhaust valve in increments. By depressing
the rocker downward until it touched the piston we verified
plenty of clearance up to 15 degrees ATDC. |
|
|
Here are the exact measurements for our combo's piston-to-valve
clearance. Augie Steinert at Superior Machine suggested this
method. Sure beats the clay method!
|
Piston-to-Valve
Clearance: Ford 400 Build
(Dial Indicator Method)
|
|
Crankshaft Position
|
Intake Valve
|
Exhaust Valve
|
|
15 degrees BTDC
|
.315"
|
.318"
|
|
10 degrees BTDC
|
.260"
|
.292"
|
|
5 degrees BTDC
|
.213"
|
.288"
|
|
2 degrees BTDC
|
.190"
|
.296"
|
|
TDC
|
.179"
|
.304"
|
|
2 degrees ATDC
|
.170"
|
.314"
|
|
5 degrees ATDC
|
.163"
|
.332"
|
|
10 degrees ATDC
|
.165"
|
.383"
|
|
15 degrees ATDC
|
.185"
|
.450"
|
 What's
Next? What's
Next?
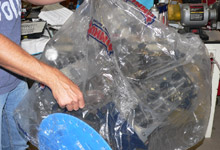
With the critical measurements and clearances confirmed,
we packed up the 400 and began thinking about the next steps
towards final assembly. As with most projects at FordMuscle,
there are short bursts of progress followed by lulls due to
the multiple project commitments. We are confident that this
represents the way you are forced to work as well. Our 400
Cleveland Build will see a bit of downtime until we complete
the next phase of the project vehicle's T5
Conversion. 
|
|
|
Posted by sobill, 06/28/08 10:40pm:
Really great article.
Get on with Part 2!
SOBill
Posted by fordmonsta, 06/29/08 06:07am:
i have a similar built 400 in a 71 ford truck, makes tons of torque and idles like a stock motor, kills chevrolets
when traction permits, wish more folks in teh aftermarket would lean in an ear and start making a few more parts
for these motors
Posted by rustedduster, 06/30/08 03:23pm:
i also have just built a 400 for my 79 f100. it was built using a 351M block, 400 crank, factory reconditioned rods with ARP bolts, .030" Tim Meyer 400 flattops, Comp 268H cam, 2bbl heads with slightly oversized valves, 1.7 roller rockers, and topped with a Edelbrock intake and a Holley 750 vacuum secondary carb. havent started it yet but im really getting anxious to.
Posted by 2800R, 07/01/08 06:32pm:
It is great to see "buildups" using the 400, however, I am disappointed in the cylinder head selection. The exhaust flow numbers on the Edelbrock head are nothing to brag about. I don't see the purpose in building a 400+ inch and then putting a Cleveland head on it that is that is not up to the task. There are Cleveland heads available that would be "at home" on that cubic inch displacement but the Edelbrock head is not one of them. Seems like a ton of Torque and HP will be left bottled up somewhere.
Posted by squireboy, 07/02/08 02:07pm:
I really appreciate your attention to detail and procedure. Too many articles assume people know the procedures and just leave them out. Very good job!
Posted by tonygiscwo4, 07/06/08 05:58am:
You guys really do a really good job of putting motors together. I think almost anybody could put a motor together following your articles.
Good job!
Posted by fordmonsta, 07/26/08 02:39pm:
yall reckon this will find it's way into project redneck?
Posted by red52steve, 07/20/09 06:39pm:
Great attention to detail! It's almost enough to make me drop a 400 in my mustang instead of the 351W I will be!
Thanks again!
Posted by 77Thunderbird, 10/21/09 12:20pm:
Can't wait for part II, very detailed, got me wanting to rip my 351M apart and rebuild it like your 400!
Posted by KC99GT, 08/28/10 01:57am:
what would be the expected hp and tourque for this motor?
Posted by FDRUMM, 05/02/11 03:15pm:
I just purchased a 1967 Fairlane and the seller threw in a 400 engine from a 77 pick-up truck. I wanted to build a big block for it and was happy to find this article as well as a couple from other blogs and the Spring 2008 Hot Rod Magazine Engine issue. There are some variations in the components that were used which i think will help produce a very interesting product. I'm a new member so please keep the great info flowing.
Posted by 1976ford100, 11/18/11 03:28am:
Nice article, I have a 400 that I'm planning for my 76 F-100, good info, and I've read and heard getting the quench right on these motors is critical to avoiding knock on pump gas.
Posted by 72FordGTS, 08/26/13 06:58pm:
Great article, but when is part 2 going to be published if ever? I recently became a paid member and I was disappointed that this article was never finished.
|
|
|
|
|


