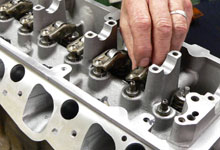
 The lash adjusters and followers are set into placed.
Many opt to install these after the cams are in place,
however that will require the use of a special Ford spring
compressor tool to enable the follower to fit under the
cam lobe. This method is easier and acceptable.
The lash adjusters and followers are set into placed.
Many opt to install these after the cams are in place,
however that will require the use of a special Ford spring
compressor tool to enable the follower to fit under the
cam lobe. This method is easier and acceptable. |
Before putting the cams in place position the crankshaft
so that the keyway is straight up in the 12 o'clock position.
This is considered "safe mode" and unlike on
most pushrod motors this ensures none of the pistons are
at Top Dead Center (TDC). This is important because once
the cams are torqued down there will be valves hanging
open that can contact a piston in the up position. |
|
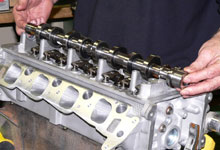
 The cams come in
two boxes and are unique to the left and right side
of the motor. Be sure to check the engraving on the
cam to ensure you've got the right cam on the right
head. With the cam lightly oiled, or lubed with moly,
set the cam girdles (or caps in the case of a Windsor
head) in position. Snug the bolts down evenly and then
torque to 89 lbs.in. Read that carefully, if you torque
to foot-pounds you'll break and warp the caps. The cams come in
two boxes and are unique to the left and right side
of the motor. Be sure to check the engraving on the
cam to ensure you've got the right cam on the right
head. With the cam lightly oiled, or lubed with moly,
set the cam girdles (or caps in the case of a Windsor
head) in position. Snug the bolts down evenly and then
torque to 89 lbs.in. Read that carefully, if you torque
to foot-pounds you'll break and warp the caps.
|
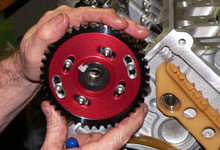
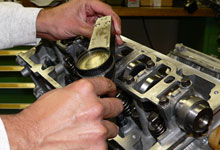
 Prior to installing the camshaft timing sprockets transfer
over the spacers from the stock cams. Then slide on the
gears aligning the keyway. The stock gears have the key
cast into the sprocket while the Fidanza gears (shown)
utilize a separate key. We had to cut the keys down to
be flush with the gear because our spacers did not have
a keyway slot. We suspect that some 4.6L motors (maybe
from the Windsor Engine Plant) utilized a slotted spacer
which enables for a longer key. We'll pass this along
to Fidanza, maybe they can through two sizes of keys into
the package.
Prior to installing the camshaft timing sprockets transfer
over the spacers from the stock cams. Then slide on the
gears aligning the keyway. The stock gears have the key
cast into the sprocket while the Fidanza gears (shown)
utilize a separate key. We had to cut the keys down to
be flush with the gear because our spacers did not have
a keyway slot. We suspect that some 4.6L motors (maybe
from the Windsor Engine Plant) utilized a slotted spacer
which enables for a longer key. We'll pass this along
to Fidanza, maybe they can through two sizes of keys into
the package. |
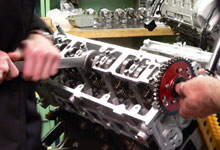
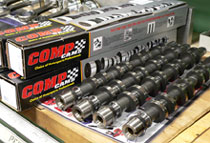
 Comp Cam's utilize M12x1.50mm bolts to retain the cam
gears. These are also TTY bolts and while they should
not be reused we know many guys do. The wiser choice is
to just get a new set. We're using ARP#256-1001, it's
the same bolt that holds the harmonic balancer so pick
up three. Use the stock hardened washer behind the bolt.
You'll need to hold the cam steady with a big wrench as
shown and torque the ARP bolts to 60 lb.ft. Make sure
that crank is set to safe-mode before you turn the cam!
Comp Cam's utilize M12x1.50mm bolts to retain the cam
gears. These are also TTY bolts and while they should
not be reused we know many guys do. The wiser choice is
to just get a new set. We're using ARP#256-1001, it's
the same bolt that holds the harmonic balancer so pick
up three. Use the stock hardened washer behind the bolt.
You'll need to hold the cam steady with a big wrench as
shown and torque the ARP bolts to 60 lb.ft. Make sure
that crank is set to safe-mode before you turn the cam! |
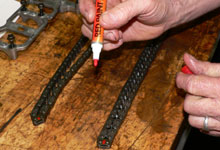
 The next step is to get the cams phased to the crankshaft
position. This is done by installing the timing chains.
Unlike on a pushrod motor where you simply line up the
crank and cam gears and get the chain on, on overhead
cam motors the idea is the same but the way you carry
it out is a little more complicated to the fact you have
two cams, four gears, and they are spread apart. Lay the
chains out on a bench and fold them in half. You can fold
them so the factory copper links are at each end. Cole
recommends marking each end link of each chain with a
paint mark to aid assembly.
The next step is to get the cams phased to the crankshaft
position. This is done by installing the timing chains.
Unlike on a pushrod motor where you simply line up the
crank and cam gears and get the chain on, on overhead
cam motors the idea is the same but the way you carry
it out is a little more complicated to the fact you have
two cams, four gears, and they are spread apart. Lay the
chains out on a bench and fold them in half. You can fold
them so the factory copper links are at each end. Cole
recommends marking each end link of each chain with a
paint mark to aid assembly. |
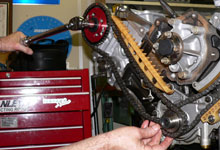
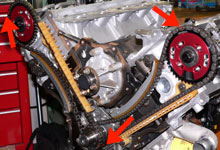
 Install the driver-side chain first, as it goes on the
rear crank sprocket. Then install the passanger-side chain.
Line up the red marked end links with the timing marks
(NOT the keyways!) in the crank and cam gears. You may
need to turn the cam shaft to make this happen. Don't
turn the crank as it should be keyway-up in safe mode.
Install the driver-side chain first, as it goes on the
rear crank sprocket. Then install the passanger-side chain.
Line up the red marked end links with the timing marks
(NOT the keyways!) in the crank and cam gears. You may
need to turn the cam shaft to make this happen. Don't
turn the crank as it should be keyway-up in safe mode. |

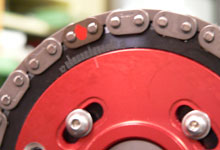
 Shown is the timing mark on the crank sprocket. There
is one mark but two sprockets. The end links (red marks)
must line up dead on with this mark. Note that this timing
mark is not the keyway.
Shown is the timing mark on the crank sprocket. There
is one mark but two sprockets. The end links (red marks)
must line up dead on with this mark. Note that this timing
mark is not the keyway. |
 On the cam gears the read mark must line up with the 0-degree
timing mark. Again do not confuse this with the keyway.
Note the 12 degrees of advance or retard possibility with
the Fidanza cam gear. We'll discuss degreeing the cams
on page 3.
On the cam gears the read mark must line up with the 0-degree
timing mark. Again do not confuse this with the keyway.
Note the 12 degrees of advance or retard possibility with
the Fidanza cam gear. We'll discuss degreeing the cams
on page 3. |
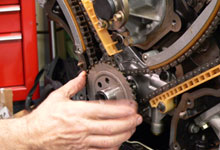
 Install the timing chain guides and tensioners (page 3
for tips on this) and perform a final check of all the
timing marks. The chains wont have full tension until
the tensioners are filled with oil, but there is enough
to turn the crank now without worry of damaging a valve
or piston.
Install the timing chain guides and tensioners (page 3
for tips on this) and perform a final check of all the
timing marks. The chains wont have full tension until
the tensioners are filled with oil, but there is enough
to turn the crank now without worry of damaging a valve
or piston. |
 Before installing the timing cover be sure to install
the crank trigger wheel.
Before installing the timing cover be sure to install
the crank trigger wheel. |
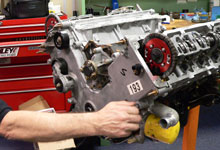
 The timing cover can go back into place. The stock gasket/seal
is reusable if it is not torn, however use a dab of silicone
sealer where the cover meets the corners of the cylinder
heads.
The timing cover can go back into place. The stock gasket/seal
is reusable if it is not torn, however use a dab of silicone
sealer where the cover meets the corners of the cylinder
heads. |
| |
|