|
Installing the Heads
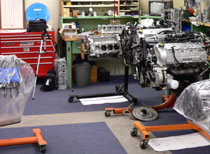
We teamed up with Cole Cutler, CHI Motorsports' master engine
builder. Under his expertise we're able to show you (and learn
ourselves) the ins and outs of the 4.6L 2V. As you'll see
it is not as daunting as it seems, and while we worked with
the motor out of the car you can certainly perform the job
under the hood. If you do plan to tackle a head swap with
the motor in the car one tip is to pull the heads with the
stock manifolds attached, then swap them over to the new heads
before installing to the block. This will save from going
under the car to remove the manifolds.
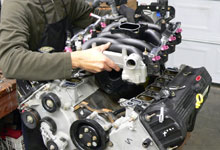
 We sourced a bone stock 4.6L 2V from a local salvage yard.
The car had just 7,800 miles before it was rear-ended
and totalled out. We began by pulling the stock plastic
intake. The injectors and fuel rails can all stay attached.
We sourced a bone stock 4.6L 2V from a local salvage yard.
The car had just 7,800 miles before it was rear-ended
and totalled out. We began by pulling the stock plastic
intake. The injectors and fuel rails can all stay attached. |
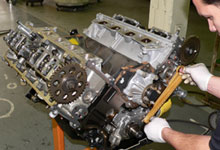
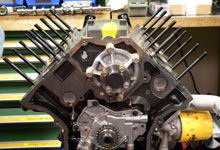
 Tear down continues with removal of the valve covers followed
by the timing cover and chains. This is a Romeo engine
as evident by the 11 valve cover bolts per head and cam
girdles. More on the differences between Romeo and Windsor
engines on page 3.
Tear down continues with removal of the valve covers followed
by the timing cover and chains. This is a Romeo engine
as evident by the 11 valve cover bolts per head and cam
girdles. More on the differences between Romeo and Windsor
engines on page 3. |

 The head bolts are removed and immediately thrown away.
You can't reuse TTY (torque to yield) hardware so don't
even try.
The head bolts are removed and immediately thrown away.
You can't reuse TTY (torque to yield) hardware so don't
even try. |
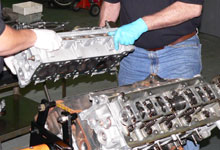
 The stock heads can come off with the cams still bolted
down. Once on the work bench you'll want to pull off the
cam girdles and get the followers and lash adjusters as
they will be reused.
The stock heads can come off with the cams still bolted
down. Once on the work bench you'll want to pull off the
cam girdles and get the followers and lash adjusters as
they will be reused. |
 We could have simply installed a new set of Ford torque-to-yield
TTY head bolts (#F5AZ6065A) on this motor, but we opted
for ArP studs (ARP# 256-4201 Buy
Now) for added clamping force. Plus unlike TTY bolts
the studs are reusable. At the time of writing this article
ARP did not have head bolts developed for these motors.
We could have simply installed a new set of Ford torque-to-yield
TTY head bolts (#F5AZ6065A) on this motor, but we opted
for ArP studs (ARP# 256-4201 Buy
Now) for added clamping force. Plus unlike TTY bolts
the studs are reusable. At the time of writing this article
ARP did not have head bolts developed for these motors.
|
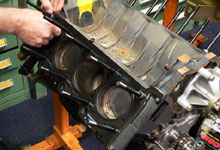
 These motors use multi-layered steel (MLS) head gaskets.
The Ford pieces cost $159 each! The Fel-Pro 9790-PT2 more
affordable choice at about $60 a piece. Coated with their
PermaTorque coating it will also seal up much better.
Unlike on pushrod Fords there is a distinct left and right
side. Note the pistons are below deck. This is "safe
mode" and is achieved with the crank key way placed
straight up at 12 0' clock. This will be important in
the cam installation phase to avoid bending valves.
These motors use multi-layered steel (MLS) head gaskets.
The Ford pieces cost $159 each! The Fel-Pro 9790-PT2 more
affordable choice at about $60 a piece. Coated with their
PermaTorque coating it will also seal up much better.
Unlike on pushrod Fords there is a distinct left and right
side. Note the pistons are below deck. This is "safe
mode" and is achieved with the crank key way placed
straight up at 12 0' clock. This will be important in
the cam installation phase to avoid bending valves. |
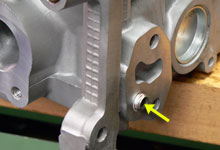
 4.6L 2V cylinder heads are not side specific, however
the head you put on the driver-side of the motor must
have this galley plug installed in the back. Otherwise
you'll fire up with zero oil pressure and a big leak.
Once you install the plug mark the heads (D for Driver
side, etc.) so you don't accidentally install on the wrong
side.
4.6L 2V cylinder heads are not side specific, however
the head you put on the driver-side of the motor must
have this galley plug installed in the back. Otherwise
you'll fire up with zero oil pressure and a big leak.
Once you install the plug mark the heads (D for Driver
side, etc.) so you don't accidentally install on the wrong
side. |
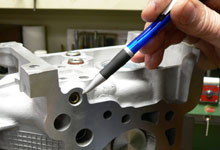
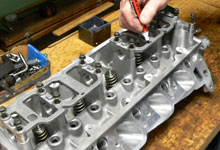
 The underside of both heads must have this plug installed.
Patriot installs this one for you, but it doesn't hurt
to double check.
The underside of both heads must have this plug installed.
Patriot installs this one for you, but it doesn't hurt
to double check. |
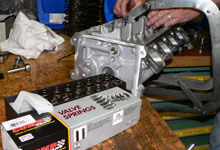
 The springs supplied by Patriot are sufficient to .600"
lift however we opted to run the springs recommended by
Comp Cams (PN:26113-16). This spring works with all three
of there Xtreme Energy cams for PI heads.
The springs supplied by Patriot are sufficient to .600"
lift however we opted to run the springs recommended by
Comp Cams (PN:26113-16). This spring works with all three
of there Xtreme Energy cams for PI heads. |
 The cam caps are machined specific to each side of the
cylinder head and cannot be interchanged. Mark them before
you remove them so they go back in the exact same location
and orientation.
The cam caps are machined specific to each side of the
cylinder head and cannot be interchanged. Mark them before
you remove them so they go back in the exact same location
and orientation. |
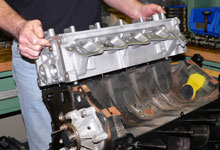
 Lower the heads onto the block and install the bolts,
or in our case since we used studs, we'll install the
washers and nuts. Use oil or moly under the heads to get
a good torque reading.
Lower the heads onto the block and install the bolts,
or in our case since we used studs, we'll install the
washers and nuts. Use oil or moly under the heads to get
a good torque reading.
Note also that we have removed the cam "girdles"
from the heads (caps for Windsor Engine Plant heads).Their
locations are unique and cannot be interchanged along
the head or between cylinder heads. Mark them before you
remove! |
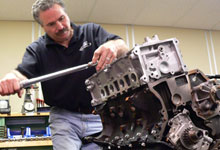
 Cole's tip when building any motor is to have both heads
on the block and alternate your torqueing of the bolts/studs
between both heads to get even stretch on the block. Work
your way out from the inside pair of head bolts to the
outside, in steps from 30lb.ft. to 50lb.ft. to the final
spec. Remember if you do use the OEM TTY head bolts they
MUST be new, and you have to follow the stretch specification
outlined in the shop manual.
Cole's tip when building any motor is to have both heads
on the block and alternate your torqueing of the bolts/studs
between both heads to get even stretch on the block. Work
your way out from the inside pair of head bolts to the
outside, in steps from 30lb.ft. to 50lb.ft. to the final
spec. Remember if you do use the OEM TTY head bolts they
MUST be new, and you have to follow the stretch specification
outlined in the shop manual. |
|