 |
From
Page 1
The Camshaft
Our initial plan with this engine was to run the stock
camshaft with 1.7:1 ratio rockers. However since we had
a brand new, Lunati hydraulic roller cam sitting in our
garage, we couldn't help but work it into this project.
The Lunati 51023 is actually supplied by Holley in their
"efi to carb" Systemax kit. For that reason
we weren't even sure if the cam would be a good match
for an EFI motor that need to meet emissions.
When we researched the cam a bit more, we learned that
Holley simply pulled the cam from Lunati's EFI lineup
of hydraulic roller cam. Lunati actually lists the 51023
as " Smooth idle hydraulic roller. Has good low end
and mid range torque and horsepower over stock. Power
range 2200-5500. "
The cam specifications are 215/224 duration at 0.050"
lift, and .522" lift on both the intake and exhaust valve.
The cam has a lobe separation angle of 112 degrees. Comparing
this cam to the popular FRPP alphabet soup cams, it falls
somewhere between a B (224/.480") and E (220/.498") cam.
The Lunati actually has more lift than these, but less
intake duration. The 112 separation angle and 215 intake
duration should keep emissions near stock at idle. We
figured it would be a smooth idling cam, with good mid
range (2500-4500) torque. The RPM intake should move the
torque band up 800 rpm or so and give us a good top end
charge. |
Assembly |
|
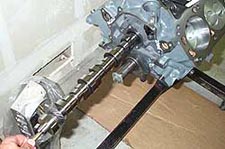
1.
The Lunati 51023 hydrualic
roller (215/224 duration / .522" lift) goes
in. We used a slight smearing of camshaft lube on
the lobes, and a large bolt threaded into the end
of the cam to help guide it into the bore without
damaging the bearings. |
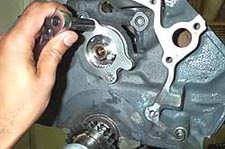
2.
With the cam in place, the retaining plate is bolted
down. Be sure to orient the plate correctly, and
we like to use a dab of Loctite red to prevent the
bolts from backing out. Only torque them to 20lb.ft.
|
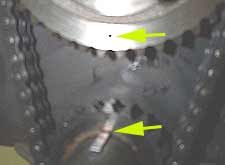
3.
The double-roller
timing gear and chain go on next. We installed the
cam straight up -ensuring the index marks on the
cam and crank gears are facing each other and lined
up perfectly. If it is off by a tooth, you must
remove the chain, turn the crank and cam, and reinstall.
One tooth is about 18 degrees- meaning the engine
wont start if you line it up incorrectly! |

4.
With the cam and timing gears installed, we turn
the motor over and install the oil pump, shaft and
pickup. We used a standard volume and pressure Melling
M68 oil pump, because our bearing clearances (.0015"
main and .002 rod) were on the tighter end of the
factory specs, and a high volume pump would just
rob horsepower. |

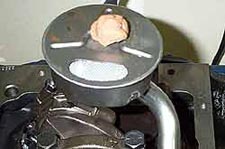
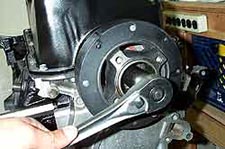
5.
It is important to check the clearance from the
pickup screen to the bottom of the oil pan. The
screen should be between 3/8" to 1/2"
from the pan bottom. Too close or too far can cause
oil starvation. You can measure as shown here by
using two rulers to measure the height of the pickup
from the pan mounting surface on the block... |
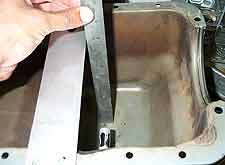
6.
...then measure the depth of the pan. Subtract the
height of the pickup from the depth of the pan,
and you have the distance the pickup will be from
the bottom of the pan once it is bolted on.
Be sure to add about 1/4" for the thickness
of the pan gasket. Better yet, when you measure
the height of the pickup, lay the pan gasket in
place to get an accurate measurement. |
7.
The other, easier, way to check for adequate pickup
clearance is to use a piece of clay or Playdough.
Place a 1" ball on the pickup, then install
the oil pan and gasket with a couple bolts to ensure
it is seated flush against the block. Then remove
the pan and carefully measure the thickness of the
clay. Shoot for 3/8" to 1/2" clearance.
|
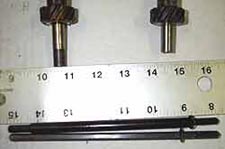
8.
An interesting change made by Ford when they introduced
the EFI/roller 5.0L is the longer distributor drive
shaft (left) compared to earlier 289-302 distributors.
This creates a problem when you attempt to use the
hardened ARP oil pump driveshaft (top). The ARP
shaft has a barreled body with about 1" of
hex section at the top to engage the distributor.
With the longer distributor the retainer clip bottoms
out at the bottom of the hex portion and prevents
the distributor from seating properly against the
block. If you use the stock oil pump driveshaft
the clip is free to slide down as far as it needs
to, because the entire shaft is a hex shape. |
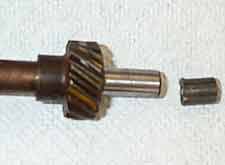
9.
There are two solutions, if you want to use
a heavy-duty oil pump drive shaft. The first is
NOT to buy the ARP (154-7904) shaft because it is
intended for the earlier 289-302 distributors. FRPP
sells a late-model specific heavy duty shaft which
has a longer hex portion, to allow the clip to slide
further down. (M6605B302)
The other option, if you already bought the ARP
shaft like we did, is to simply hack off the 1/2"
extension on the distributor shaft, as shown here.
It won't have any affect on the strength of the
distributor, and we're not sure why Ford made this
change in the first place. |

10.
We replaced the front seal in our "reconditioned"
timing cover and installed it on the block, using
a Fel Pro gasket and very light spread of silicone
RTV on both sides of the gasket to ensure a leak
free seal. |
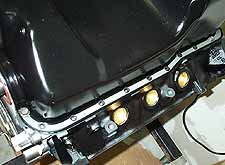
11.
The oil pan is installed
next using the 5.0L specific one-piece rubber gasket.
You do not need to use any sealer with this type
of gasket, just ensure the end seal portions of
the gasket are properly seated into the timing cover
and rear main cap grooves.
|
12.
With the pan and timing
cover in place, we installed the harmonic balancer.
To keep costs down we bought a new stock replacement
50oz balancer ($100) rather than one of the better
constructed but more expensive brands. Spread a
thin film of moly or oil on the crank hub before
installing the damper to prevent it from binding.
Torque the bolt to 100 lb.ft. and be sure to install
the thick washer under the head of the bolt! |
| |
|
 (More
assembly.) (More
assembly.) |
|
|
|
|
|
|
|
|

Cam Selection
We choose the Lunati 51023 camshaft for it's mild but EFI
intended specfications. (View
large)
|
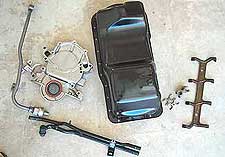
Planning ahead
For under $75 we gathered everything we'd need to assemble
the complete engine on the stand, minus valve covers (someone
beat us to them). We spent the rest of the day cleaning the
parts and then painting them with satin black and Eastwoods
"Detail Gray". The parts looked better than new
and we saved a ton of time, work and aggravation during the
day of the actual engine swap because we weren't relying on
dirty parts coming off the motor in car. |
|


