 |
 |
 |
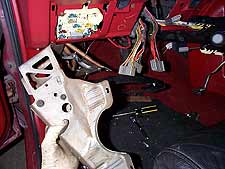
| 1.
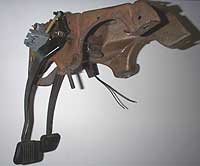
Here is the T5 pedal assembly we pulled from the donor car.
You cannot install the clutch pedal on the automatic pedal
assembly. |
2.
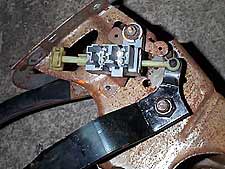
On the lefthand side of pedal assembly are the neutral saftey
and clutch interlock switches. Make sure you get these when
pulling pedals from a donor car. |
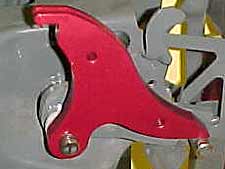
3.
On the right side of the pedal assembly is the cruise control
switch, which disengages the cruise when the clutch is pressed.
Also notice the stock plastic clutch cable quadrant. |
 |
 |
 |
| 4.
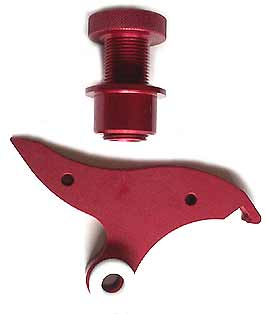
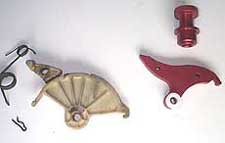
Now is a good time to install the new quadrant on the pedal
assembly. Remove the two hair-pin clips and slide off the
stock plastic quadrant, adjuster and spring. |
5.
The supplied white bushing goes on first, then the quadrant.
Secure it with the stock hairpin clip. The front of the quadrant
should rest on the stop as shown. |
6.
On AOD Mustangs, the factory routes the speedo cable through
the clutch cable hole. The highlighted area is where the speedo
needs to be relocated to. |
 |
 |
 |
| 7.
To re-route the speedo cable, the gauge cluster needs to be
removed. Remove the dash cover and disconnect the switch plugs
to access the half-dozen torx screws that secure the gauge. |
8.
Squeeze the white clip on the speedo cable and pull the cable
off the gauge. Now the cable can be pulled through the firewall
and rerouted through hole shown in pic.6. Reattach the cable
and reassemble the dash |
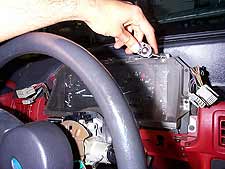
9.
Remove the two nuts that hold the steering column bracket,
and let the steering column hang down as low as possible.
You'll want to remove the harnesses that plug into the column
to avoid straining the wires. Remove the upper pedal bracket
bolt shown in the highlighted region in the photo. |
 |
 |
 |
| 10.
Four 9/16" nuts hold the pedal bracket to the firewall,
you can access all but one with a ratchet. Be sure to disconnect
the master cylinder push rod from the brake pedal, it's held
in place with a hair-pin clip. |
11.
The top left pedal bracket nut cannot be reached from underneath.
Take our word for it, otherwise you'll spend an hour swearing
and cussing. The way to get to it is with a super long 3/8"
extension, reaching through the dash as shown. |
12.
If you're lucky the pedal will come out without any of your
blood on it. Otherwise, expect to wrestle with it for a while,
eventually it will work its way out from the tangle of wires
and brackets under the dash. Take a breather, because the
new clutch pedal assembly goes in the same way |
 |
 |
 |
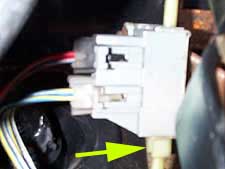
13.
With the pedals in place, the hardest part of the swap is
behind you!
Before you climb out from under the dash, find the two plugs
shown in the highlighted region in the photo. On AOD cars
they are jumpered and taped up as part of the large bundle
of wires near the drivers side vent. |
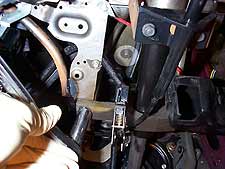
14.
Remove the jumpers and attach the plugs into the switch on
the clutch pedal. Note, the two plugs look similar, but they
are not, each one will fit a unique position on the switch
as shown. Once they are plugged in, grab the white serrated
plastic rod and pull the square adjuster (arrow) as far up
as it will go, you'll feel it ratchet up. You can see this
rod better in pic.2. |
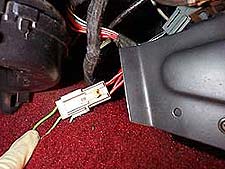
15.
On AOD cars, behind the stereo and console you'll find a plug
with a green jumper wire. This is the cruise control disengage
circuit. If you have cruise, you'll want it to disengage when
the clutch pedal is pressed. Remove the jumper and attach
to the switch shown in pic.3. |
 |
 |
 |
| 16.
Remove the rubber bushing that is included with the stock
cable, and use a razor blade to cut off the four plastic tabs
at the end of the firewall bushing. |
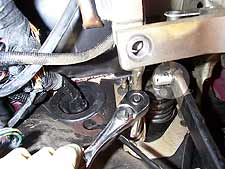
17.
Place bead of RTV around the lip of the adjuster and place
it through the firewall until the lip seats squarely. Then
feed the cable through and seat the plastic cable bushing
into the aluminum adjuster. From under the dash, attach the
cable to the hook on the quadrant. |
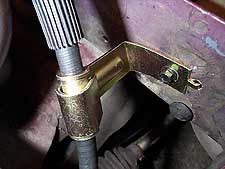
18.
The new replacement cable comes with a bracket which attaches
to the factory mounting point above the motor mount and k-member.
We had to bend our mount slightly to keep the cable from touching
the headers. |
|
|
Continue>> |