|
by Chirag Asaravala
We review a lot of wideband air-fuel meters here at FordMuscle
because we strongly believe they are the single most beneficial
advancement in this hobby in the last decade. Consumer level
wideband air-fuel meters have completely changed how, and
who, can tune engines. Their recent affordability makes them
a tuning tool no serious enthusiast should do without. The
challenge, however, has been finding a meter that balances
necessary features with ease of use. Because this technology
spawned from competition use, many of the manufacturers have
struggled with building a meter that is not overly complicate
to use.
Last year we tested the Fuel
Air Spark Technologies (FAST) wideband meter. We were
impressed by its self-contained operation that didn't require
a PC, as well as its ability to monitor two air-fuel sensors
at once (e.g. both banks on a V8 engine.) We thought this
was a great meter for non-computer savvy guys, or guys like
me who work with computers for a
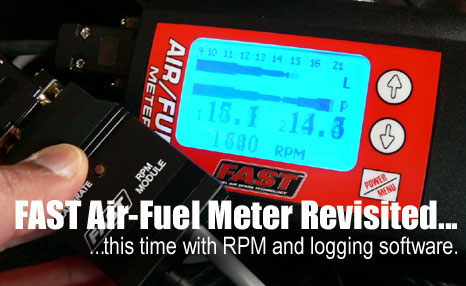
The FAST RPM Module (PN 170536)
rounds out the FAST wideband air-fuel meter with rpm input
and logging, as well as the ability to export log files
to your PC using FASTView
software. |
living, and don't want to do so again when when working on
our project car.
However, as we spent more time with the FAST meter, two major
drawbacks begin to emerge. First, the unit had no rpm input.
While the FAST meter displayed the air-fuel ratios on the
screen, and allowed easy ability to log the ratios for later
playback, the absence of rpm made it difficult to pinpoint
where the air-fuel ratios were rich or lean. You simply had
to go off of time, and when you are barreling 400 horsepower
at wide-open throttle down a country road, you simply have
no recollection of what throttle position or gear you might
have been in 8 seconds into the log.
The second shortcoming was the lack of a way to export the
log file for analysis on a PC. Now I realize earlier I said
I was thankful to not have to use a PC while using the FAST
meter. However, it turns out, there is only so much information
you can glean from a four inch display. It would be much more
useful to see the logged data as a chart, rather than simply
a full speed playback.
Well the good news is FAST has addressed both of these issues.
They recently released an RPM kit which allows you to pull
in a tach feed and display it on the screen along side the
air-fuel ratio. FAST has also developed FASTView software,
a free download, that allows you to pull the log file off
the meter and analyze it in various ways.
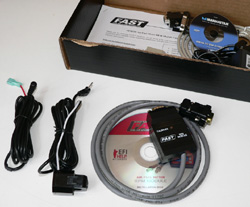
Installing the RPM module is pretty easy but you'll need to
upgrade the firmware on the FAST meter. FAST provides the
necessary cables and instructions to do so in the RPM Module
kit. We've outlined the procedure here and also provided a
preview of the FASTView logging software.
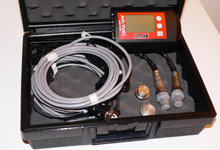
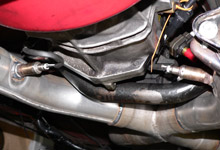
 This is the FAST dual- sensor kit comes that we reviewed
last year. Getting the unit working is as simple as welding
the two supplied M18x1.5 bungs into your exhaust, installing
the sensors and connecting the wiring. The on-screen display
walks you though the setup. The shortcomings, at the time,
were the lack of RPM logging and software to review the
logs.
This is the FAST dual- sensor kit comes that we reviewed
last year. Getting the unit working is as simple as welding
the two supplied M18x1.5 bungs into your exhaust, installing
the sensors and connecting the wiring. The on-screen display
walks you though the setup. The shortcomings, at the time,
were the lack of RPM logging and software to review the
logs. |
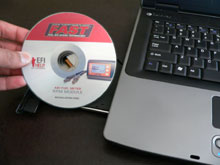
 Most of the "installation" involved with the
RPM kit is in upgrading the FAST air/fuel meter with the
new firmware for viewing engine rpm - a process called
"flashing". Start by inserting the included
CD into your PC.
Most of the "installation" involved with the
RPM kit is in upgrading the FAST air/fuel meter with the
new firmware for viewing engine rpm - a process called
"flashing". Start by inserting the included
CD into your PC. |

 A couple of on-screen prompts will walk you through the
process of getting the new FAST firmware and flash software
onto your computer. Let it install to its default location
to make things simpler. The next step is to get it on
to your FAST unit.
A couple of on-screen prompts will walk you through the
process of getting the new FAST firmware and flash software
onto your computer. Let it install to its default location
to make things simpler. The next step is to get it on
to your FAST unit. |
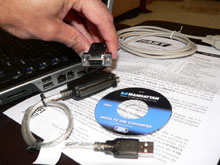
 The RPM kit comes with a couple of cables to connect your
PC to the FAST unit. If your PC has a serial port you're
in luck, you can use the serial cable (in hand) and skip
the next couple steps. However most laptops don't have
serial ports anymore, so you'll need to use the USB to
serial converter cable (foreground.)
The RPM kit comes with a couple of cables to connect your
PC to the FAST unit. If your PC has a serial port you're
in luck, you can use the serial cable (in hand) and skip
the next couple steps. However most laptops don't have
serial ports anymore, so you'll need to use the USB to
serial converter cable (foreground.) |
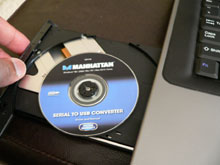
 Before connecting the USB/Serial converter cable to your
PC, you'll need to install a driver. Insert the supplied
CD and let it do its thing. You'll get a prompt informing
you the driver is installed.
Before connecting the USB/Serial converter cable to your
PC, you'll need to install a driver. Insert the supplied
CD and let it do its thing. You'll get a prompt informing
you the driver is installed. |
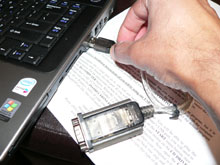
 Once the driver is installed, plug the USB/Serial converter
cable into a free USB port. Don't connect the serial cable
and FAST unit at this time.
Once the driver is installed, plug the USB/Serial converter
cable into a free USB port. Don't connect the serial cable
and FAST unit at this time. |
|
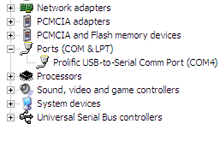
 Assuming you are running a Windows 2000 or XP machine,
it will recognize the cable, find the driver you installed,
and you'll be good to go. You can confirm the installation
through the Device Manager (from Control Panel >
System) and look under Ports. You should see "USB
to Serial Com Port" and the port number.
Assuming you are running a Windows 2000 or XP machine,
it will recognize the cable, find the driver you installed,
and you'll be good to go. You can confirm the installation
through the Device Manager (from Control Panel >
System) and look under Ports. You should see "USB
to Serial Com Port" and the port number.
|
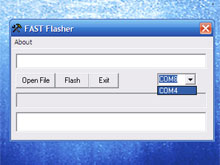
 We're almost done. Now find "FAST Flasher" in
your Start menu and run the program. You'll get a small
box like above. Change the selector to reflect the correct
com port. If you aren't sure no worries, you can proceed
by trial and error.
We're almost done. Now find "FAST Flasher" in
your Start menu and run the program. You'll get a small
box like above. Change the selector to reflect the correct
com port. If you aren't sure no worries, you can proceed
by trial and error. |
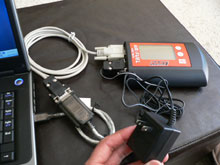
 Finally, connect the serial cable toto the USB converter
and to the FAST unit, as shown. Then use the supplied
110V converter to power the unit.
Finally, connect the serial cable toto the USB converter
and to the FAST unit, as shown. Then use the supplied
110V converter to power the unit. |
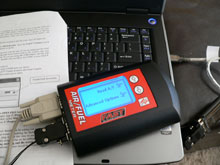
 The unit will power up and stop at the first menu screen.
There is no need to make a selection or control the unit
via the on screen display.
The unit will power up and stop at the first menu screen.
There is no need to make a selection or control the unit
via the on screen display. |
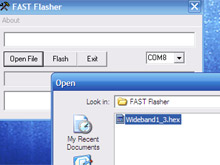
 Select "Open File" in the FAST Flasher and it
should find the firmware file that you installed back
in step 2.
Select "Open File" in the FAST Flasher and it
should find the firmware file that you installed back
in step 2. |
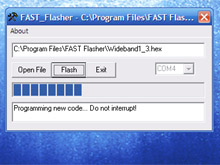
 Select FLASH and the firmware will be written to your
FAST unit. This process takes a few seconds.
Select FLASH and the firmware will be written to your
FAST unit. This process takes a few seconds. |
|