More Power
to Ya! Power Brakes for your Early Mustang
-continued- |
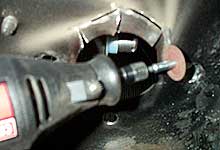
Using a cut-off wheel or any other means,
we carefully cut out the marked area. |

The firewall is now modified and ready
to accept the booster. Note that all we did was open up the
pushrod hole, drilled out the two threaded nuts, and drilled
a new hole at the bottom. The two mounting holes at the very
top are not altered. |

Secure the booster to the firewall with
the mounting ear as shown. Then go under the dash to install
the pedal and fasten the nuts on the studs. |
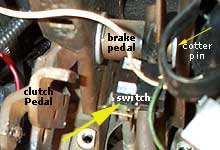
Removing the old pedal is simple on an
automatic car, but a little more involved if the car has a clutch
pedal, because the brake pedal is mounted on the same shaft
as the clutch pedal. Disconnect the switch and pushrod, then
the cotter pin. Slide the clutch pedal out -this may require
temporarily removing the air vent on the driver side. |
The power brake pedal uses mounting holes
higher up on the pedal bracket. Use the supplied bolt and nut
to secure the pedal to the bracket. Note the booster studs protruding
through the carrier. Nuts are used to secure the booster studs,
then the booster pushrod is connected to the pedal. |
With the booster bolted up, the next
step would be to mount the master cylinder and fab up some new
brake lines from the master cylinder to the distribution block.
However we ran in to a glitch... |

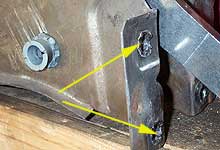
At the same time we were converting to
power brakes, we were also installing cable clutch conversion
kit. The kit utilizes a bracket on the firewall to secure the
cable. Unfortunately the 9" booster interferes with the
plate. We tried to modify the plate, but in the end the booster
had to go. |
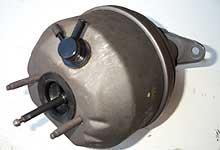
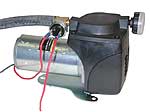
We ended up purchasing a rebuilt 8"
Bendix booster, the same units originally used in 65-70 Mustangs.
This booster clears the clutch cable bracket without any issues.
|
Note how the studs are significantly
shorter than those on the MPBrakes 9" booster. Unfortunately
these will not stick out far enough to get nuts on. |
We learned that Mustangs with manual
brakes used "swaged nuts" on the pedal bracket. Mustangs
originally equipped with a power booster did not.
|
To install the 8" booster we need
to remove the swage nuts completely (grind them off.) This cannot
be accomplished with the bracket still in the car. Needless
to say removing the bracket is a pain in the ass, but it is
necessary. |
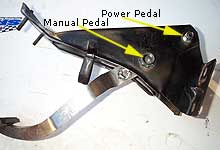
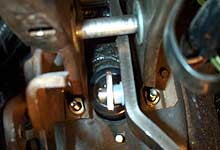
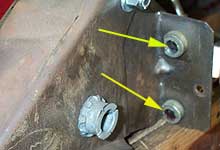
Shown is the bracket with the swage nuts
removed to enable the studs on the 8" booster to protrude
through. This photo also shows the where the power brake pedal
mounts compared to where the manual pedal mounted. |
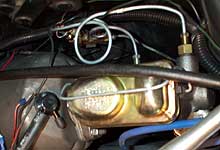
We purchased a selection of 5/16"
brake lines in varying lengths from the parts store. Rather
than cutting and flaring we simply placed loops in the lines.
The loops also serve to reduce stress in the line. With the
lines connected, bleed the brakes and check for leaks. Before
starting the car be sure to connect the booster vacuum line
to a manifold vacuum source. |
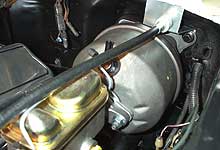
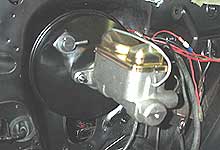
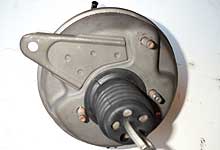
The 8" booster sticks out considerably
more than the 9" MPBrakes booster. However the stock booster
does clear the Modern Driveline clutch cable bracket. |


 Vacuum
is primarily determined by the camshaft and intake manifold.
A large duration and overlap cam (relative to the displacement
of the engine) will hurt idle vacuum, which will result in
a stiff brake pedal and poor power assist.
Vacuum
is primarily determined by the camshaft and intake manifold.
A large duration and overlap cam (relative to the displacement
of the engine) will hurt idle vacuum, which will result in
a stiff brake pedal and poor power assist.