
Head Assembly
With the heads milled and cleaned, we're ready to assembly
the hardware. As mentioned earlier, we opted to get most
of the valve train hardware from Crane. This ensures we
get the correct springs, retainers, etc. to match our
cam specs. One of the most frustrating things to experience
is a valvetrain that doesn't go together right, or springs
that float when you go to push the engine. Sticking with
the manfacturers matched components all but ensures success.
Solid roller cams require the use of extremely high spring
pressures. We're using Crane (Part No. 99893) double springs
with 165 lbs. seat, and 426 lbs. open pressure; with an
installed height of 1.750". Installed height is a
critical factor when installing any set of valve springs.
The pressure rating of the spring will vary with height,
which directly affects its ability to control the valves.
More often than not you will need to use shims to meet
the installed height specs for your springs. Shims come
in three heights, 0.015", 0.030", and 0.060".
However shims come in a variety of inner and outer diameter
combinations; so it is extremely important that you select
the correct shims. In the photo series below we'll take
you though the process of correctly setting up the valve
springs and related components on a cylinder head.
| Setting up
the Valve Springs |
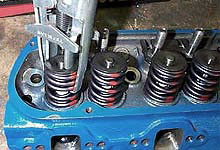
 Start by checking the installed height. Measure
with a small macinists rule or spring micrometer
from spring seat to underside of the retainer. Add
shims to decrease space, or machine the seat to
increase. The objective is to meet the specification
listed on the cam card.
Start by checking the installed height. Measure
with a small macinists rule or spring micrometer
from spring seat to underside of the retainer. Add
shims to decrease space, or machine the seat to
increase. The objective is to meet the specification
listed on the cam card. |
 Only use hardended/heat treated shims. Otherwise
you'll end up with shrapnel
in your motor. The correct shim will properly locate
around the valve guide, and/or fit spring seat,
as well as be the correct diameter for the spring
being used. Shims usually come in 0.015", 0.030",
0.060" thicknesses.
Only use hardended/heat treated shims. Otherwise
you'll end up with shrapnel
in your motor. The correct shim will properly locate
around the valve guide, and/or fit spring seat,
as well as be the correct diameter for the spring
being used. Shims usually come in 0.015", 0.030",
0.060" thicknesses. |
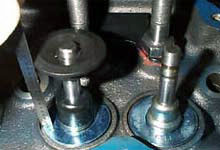
 The majority of aftermarket heads come with guideplates
and screw-in studs. This set-up is offers increased
stability, strength, and adjustbility over rail
type or pedestal mount rockers. Whenever possible
we recommend stepping up to 7/16" studs rather
than 3/8" for maximum strength. Some heads
(such as Worlds) require using sealer on the stud
threads as the holes are open to the head coolant
passages.
The majority of aftermarket heads come with guideplates
and screw-in studs. This set-up is offers increased
stability, strength, and adjustbility over rail
type or pedestal mount rockers. Whenever possible
we recommend stepping up to 7/16" studs rather
than 3/8" for maximum strength. Some heads
(such as Worlds) require using sealer on the stud
threads as the holes are open to the head coolant
passages. |
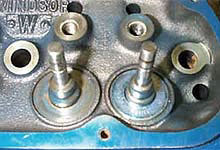
 There are two major types
of oil seals. The "umbrella"
seal rides the valve stem, while the Teflon
seals fits snug over the guide and "scrapes"
the oil off the valve stem. Teflons are better at
controlling oil through the valve guide, and more
importantly they clear double springs and high-lift
cams. Teflon seals
come in 0.500" ID or 0.531" ID, so the
valve guide outer diameter may have to machined
to this size to allow the seal to "cap"
the guide.
There are two major types
of oil seals. The "umbrella"
seal rides the valve stem, while the Teflon
seals fits snug over the guide and "scrapes"
the oil off the valve stem. Teflons are better at
controlling oil through the valve guide, and more
importantly they clear double springs and high-lift
cams. Teflon seals
come in 0.500" ID or 0.531" ID, so the
valve guide outer diameter may have to machined
to this size to allow the seal to "cap"
the guide. |
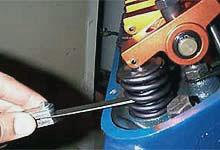
 The valve springs are installed
with this handheld spring compressor (Craftsman
brand). Be sure to wear eye protection when handling
compressed valve springs, they hold quite a bit
of force.
The valve springs are installed
with this handheld spring compressor (Craftsman
brand). Be sure to wear eye protection when handling
compressed valve springs, they hold quite a bit
of force. |
 The
final step is to check the coil springs for binding.
Install pushrods and rocker arms for at least one
cylinder. Rotate the crank until the valve is fully
open, and with a feeler guage check for at least
0.060" clearance between the center two coils. The
final step is to check the coil springs for binding.
Install pushrods and rocker arms for at least one
cylinder. Rotate the crank until the valve is fully
open, and with a feeler guage check for at least
0.060" clearance between the center two coils.
|
|
 (Intake Selection and Preparation)
 |
| |
|
|
|
|
|


