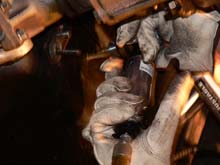
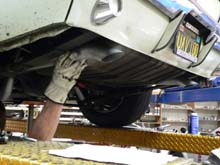
 Using a stepped drill bit Terry drills out the marked
holes to 3/8".
Using a stepped drill bit Terry drills out the marked
holes to 3/8". |
|
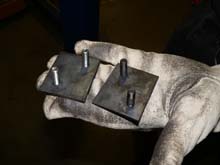
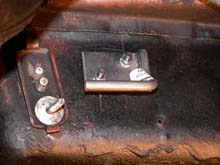
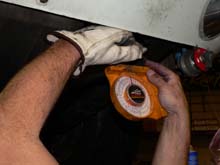
 The included stud plates provide reinforcement for the
hangers; plus the bolt heads are tacked to the plate so
you dont need someone to keep them from turning during
the install.
The included stud plates provide reinforcement for the
hangers; plus the bolt heads are tacked to the plate so
you dont need someone to keep them from turning during
the install. |
| |
|
|
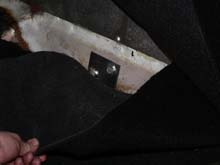
 The rear seat is removed and the carpet pulled back exposing
the freshly drilled holes. The stud plates are set into
place.
The rear seat is removed and the carpet pulled back exposing
the freshly drilled holes. The stud plates are set into
place. |
|
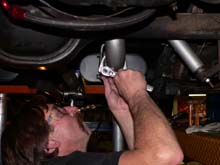
 From under the car the hangers are installed as shown,
with the hanger ends pointing inwards. Spin the nuts on
and crank them down.
From under the car the hangers are installed as shown,
with the hanger ends pointing inwards. Spin the nuts on
and crank them down. |
| |
|
|
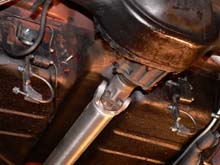
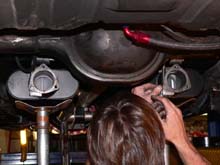
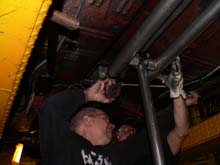
 A closer look at the installed hanger. This is a solid
mounting point and will ensure the muffler and pipes never
sag. Notice how the previous exhaust was poorly supported,
with a stud welded to the seat belt bracket.
A closer look at the installed hanger. This is a solid
mounting point and will ensure the muffler and pipes never
sag. Notice how the previous exhaust was poorly supported,
with a stud welded to the seat belt bracket. |
|
 The supplied rubber clamp/hanger assemblies are set into
position. Notice how the clamp bolts for both sides face
to the passenger side.
The supplied rubber clamp/hanger assemblies are set into
position. Notice how the clamp bolts for both sides face
to the passenger side. |
| |
|
|
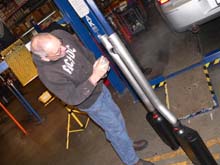
 Terry positions the Super44™ mufflers into the clamps.
He recommends leaving all the clamps loose until the mufflers
and pipes are all in position.
Terry positions the Super44™ mufflers into the clamps.
He recommends leaving all the clamps loose until the mufflers
and pipes are all in position. |
|
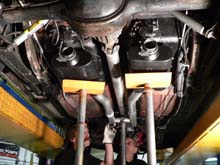
 Next, the H-pipe is set into place. A quick visual check
is conducted to ensure the pipes are free from any interefence
with the driveshaft or other under-chassis components.
Next, the H-pipe is set into place. A quick visual check
is conducted to ensure the pipes are free from any interefence
with the driveshaft or other under-chassis components. |
| |
|
|

 Here is a tip from the pros. After
the mufflers and H are verified to fit correctly and without
intereference, remove them and set on a level surface
for tack welding.
Here is a tip from the pros. After
the mufflers and H are verified to fit correctly and without
intereference, remove them and set on a level surface
for tack welding. |
|

 Mike tacks the mufflers to the H-pipe. This ensures the
mufflers and H are dead-level and avoids the unsightly
"tilted" muffler look that is common on many
amateur installations.
Mike tacks the mufflers to the H-pipe. This ensures the
mufflers and H are dead-level and avoids the unsightly
"tilted" muffler look that is common on many
amateur installations. |
| |
|
|
 The muffler and h-pipe unit are set back into place.
 |
|
 We asked the guys at Flowmaster to give us flanged tailpipes
to allow easy removal of the exhaust system in the event
we need to drop the transmission. This isn't part of the
67-70 kit, however any exhaust shop can supply you with
the flanges, or perform the job for you.
We asked the guys at Flowmaster to give us flanged tailpipes
to allow easy removal of the exhaust system in the event
we need to drop the transmission. This isn't part of the
67-70 kit, however any exhaust shop can supply you with
the flanges, or perform the job for you. |
| |
|
|
 It is best to install the tail pipes next. If you wait
until the headers are connected to the intermediate pipes
you are likely to end up with uneven tail pipes.
It is best to install the tail pipes next. If you wait
until the headers are connected to the intermediate pipes
you are likely to end up with uneven tail pipes. |
|
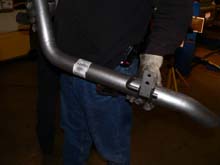
 Flowmaster has done a very nice job of desiging the mandrel
bent 2.5" tailpipes. They fit over the axle tubes
without issue and offer plenty of clearance around the
shocks, brake and fuel lines.
Flowmaster has done a very nice job of desiging the mandrel
bent 2.5" tailpipes. They fit over the axle tubes
without issue and offer plenty of clearance around the
shocks, brake and fuel lines. |
| |
|
|

 The tail pipes mount to existing holes in the Mustangs's
rear frame rails, using supplied hangers and reinforcement
plates hardware.
The tail pipes mount to existing holes in the Mustangs's
rear frame rails, using supplied hangers and reinforcement
plates hardware. |
|
 We repeat the process on the other side. Both tips are
then eyeballed for proper alignment and spacing from the
rear valence.
We repeat the process on the other side. Both tips are
then eyeballed for proper alignment and spacing from the
rear valence. |
| |
|
|
 These guys at Flowmaster are perfectionists
- though the tips looked perfectly aligned to my eyes,
the guys went back and measured using an angle finder.
Slight adjustments can be made moving the tail pipe hangers
up or down.
These guys at Flowmaster are perfectionists
- though the tips looked perfectly aligned to my eyes,
the guys went back and measured using an angle finder.
Slight adjustments can be made moving the tail pipe hangers
up or down. |
|
 When the tips are aligned as desired, the pipes are then
clamped tight to the mufflers, or in our case bolted to
the flanges and their position tack welded into place.
When the tips are aligned as desired, the pipes are then
clamped tight to the mufflers, or in our case bolted to
the flanges and their position tack welded into place. |
| |
|
|
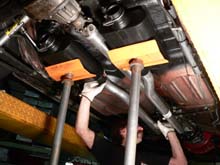
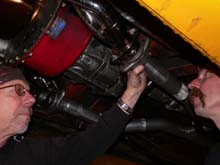
 The guys then turn their attention to the front of the
system. Mike checks that the H-pipe is properly centered
under the car by measuring from each pipe to the outer
pinch welds of the uni-body. These guys are meticulous;
they expected alignment to 1/8 inch.
The guys then turn their attention to the front of the
system. Mike checks that the H-pipe is properly centered
under the car by measuring from each pipe to the outer
pinch welds of the uni-body. These guys are meticulous;
they expected alignment to 1/8 inch. |
|
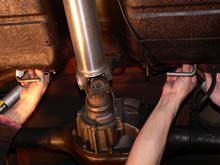
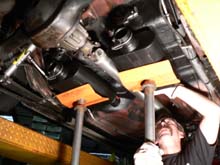
 Another little tip - place a block between the driveshaft
and h-pipe to ensure at least 1/2" clearance when
you weld up the header pipes.
Another little tip - place a block between the driveshaft
and h-pipe to ensure at least 1/2" clearance when
you weld up the header pipes. |
| |
|
|
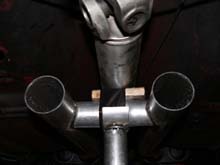
 Connecting the exhaust to the
headers is acheived by mixing and rotating the various
straight and "s" bends provided in the kit.
Connecting the exhaust to the
headers is acheived by mixing and rotating the various
straight and "s" bends provided in the kit. |
|
 Using Flowmasters ball-flange
connectors, the headers seal up nicely.
Using Flowmasters ball-flange
connectors, the headers seal up nicely. |
| |
|
|
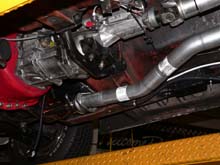
 With all the pipes in position
they guys verify sufficient ground clearance (flat bar
placed across the lift), then all the joints are welded
up.
With all the pipes in position
they guys verify sufficient ground clearance (flat bar
placed across the lift), then all the joints are welded
up. |
|
 After the welds have cooled Flowmaster
recommends removing the system and spray painting the
welds with high-temp paint to prevent rusting.This is
particularly important if you live or drive in wet climates.
After the welds have cooled Flowmaster
recommends removing the system and spray painting the
welds with high-temp paint to prevent rusting.This is
particularly important if you live or drive in wet climates. |
| |
|
|

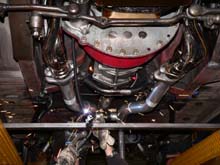
 Finally, they fully welded system
is bolted back into place.
Finally, they fully welded system
is bolted back into place. |
|
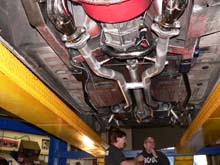
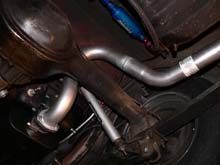
 And there it is - the best designed
exhaust system for 67-70 Mustangs. Look how well the pipes
fit under the car, and how symetric both sides look.
And there it is - the best designed
exhaust system for 67-70 Mustangs. Look how well the pipes
fit under the car, and how symetric both sides look.  |
| |
|
|
| |
|
|
|
|
|


