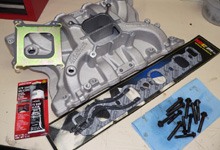
 Some inexpensive Mr. Gasket brand intake gaskets were
used to bolt-on one of those aftermarket four-barrel aluminum
intakes.
Some inexpensive Mr. Gasket brand intake gaskets were
used to bolt-on one of those aftermarket four-barrel aluminum
intakes.
|
|

 I torqued down the manifold to 25 lbs reusing the factory
fasteners.
I torqued down the manifold to 25 lbs reusing the factory
fasteners. |
| |
|
|
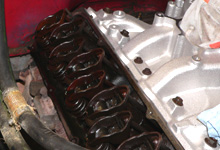
 Pulling the stock valve covers revealed a sludge-free
valve train.
Pulling the stock valve covers revealed a sludge-free
valve train. |
|
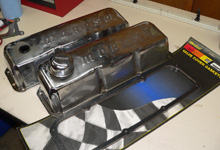
 Since the stock valve covers were bent along the mating
surface, I tossed these old cleveland valve covers on
with fresh Mr. Gasket brand gaskets.
Since the stock valve covers were bent along the mating
surface, I tossed these old cleveland valve covers on
with fresh Mr. Gasket brand gaskets. |
| |
|
|
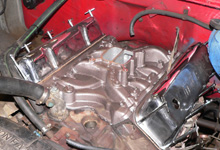
 I didn't like the look of the aluminum intake against
the aged brown of the original cylinder heads, block,
and water pump. So I painted the new intake brown to match.
I didn't like the look of the aluminum intake against
the aged brown of the original cylinder heads, block,
and water pump. So I painted the new intake brown to match.
|
|

 Next, I cleaned up the balancer and added a timing tape
for more accurate tuning.
Next, I cleaned up the balancer and added a timing tape
for more accurate tuning. |
| |
|
|
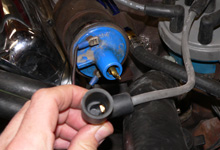
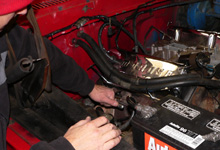
 You have to wonder how some things run. I discovered the
coil wire terminal was fracturing.
You have to wonder how some things run. I discovered the
coil wire terminal was fracturing. |
|
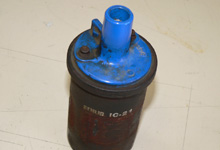
 Look at this coil. Hard to believe the terminals were
still making
Look at this coil. Hard to believe the terminals were
still making
connection. |
| |
|
|
 Back to the basics, I checked the plugs.
 |
|
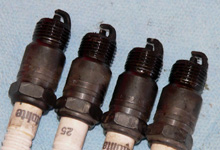
 Most likely a result of malfunctioning smog equipment,
the plugs were fouled and in need of replacement.
Most likely a result of malfunctioning smog equipment,
the plugs were fouled and in need of replacement. |
| |
|
|
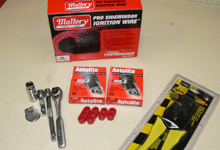
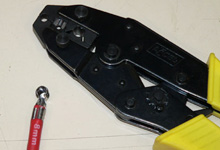
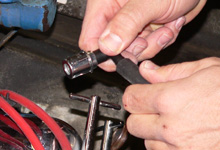
 I picked up some Autolite Plugs, Mallory Sidewinder Wires,
and an Accel Wire Crimping tool to get the ignition in
order. See
ACCEL sidebar on page 1 of this article.
I picked up some Autolite Plugs, Mallory Sidewinder Wires,
and an Accel Wire Crimping tool to get the ignition in
order. See
ACCEL sidebar on page 1 of this article. |
|
 It's amazing that it took me almost 20 years of wrenching
before I got the correct wire crimps for doing spark plug
wire terminals.
It's amazing that it took me almost 20 years of wrenching
before I got the correct wire crimps for doing spark plug
wire terminals.
|
| |
|
|
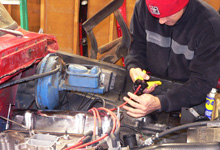
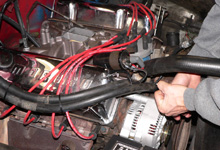
 I prefer cut-to-fit plug wire sets like the Mallory Sidewinder
wires I
I prefer cut-to-fit plug wire sets like the Mallory Sidewinder
wires I
used here. They allow for a cleaner motor compartment.
Look how nice the crimps come out when you've got the
right tool. |
|
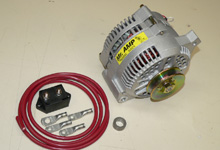
 Next, I added a Mr. Amp 3G 130 amp alternator from Performance
Distributors. This one wire unit comes with a cut and
crimp-to-fit power wire. See
Performance Distributors sidebar on page 1 of this article.
Next, I added a Mr. Amp 3G 130 amp alternator from Performance
Distributors. This one wire unit comes with a cut and
crimp-to-fit power wire. See
Performance Distributors sidebar on page 1 of this article. |
| |
|
|
 Once installed, the motor compartment began to take on
a new identity.
Once installed, the motor compartment began to take on
a new identity. |
|
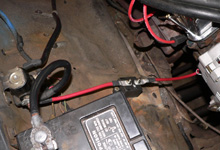
 The one wire setup eliminates the stock voltage regulator
and related
The one wire setup eliminates the stock voltage regulator
and related
wiring harness. One wire from the back of the alternator
over to the
positive side of the starter solenoid and it's ready to
start charging.
|
| |
|
|
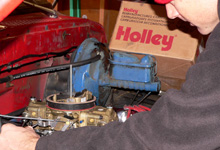
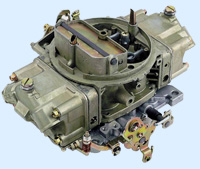
 Holley offers this remanufactured 600 cfm mechanical secondary
street/strip carburetor for around $280.00. The small
600 cfm size is suitable for a 351M with a stock cam and
offers enough tunable performance for a high torque 400.
See Holley sidebar on this page.
Holley offers this remanufactured 600 cfm mechanical secondary
street/strip carburetor for around $280.00. The small
600 cfm size is suitable for a 351M with a stock cam and
offers enough tunable performance for a high torque 400.
See Holley sidebar on this page. |
|
 While most of the smog gear was removed, I still installed
my own PCV
While most of the smog gear was removed, I still installed
my own PCV
system to prevent crankcase gases from entering the cab.
|
| |
|
|
 Here's a top view of the setup. It can be made very clean
by using two 90 degree PCV valves, a 3/8" vacuum
tee, and 3/8" fuel line.
Here's a top view of the setup. It can be made very clean
by using two 90 degree PCV valves, a 3/8" vacuum
tee, and 3/8" fuel line. |
|

 To keep it real, I decided to reuse the stock air cleaner.
However, when
To keep it real, I decided to reuse the stock air cleaner.
However, when
I added a "high-rise" Purolator element, the
lid had a conflict with the
cowl. Solutions? Trim to fit. |
| |
|
|

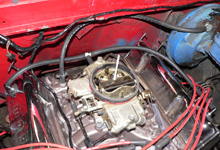
 The final look was one to be proud of. Not to mention,
the much more tunable and serviceable motor compartment.
The final look was one to be proud of. Not to mention,
the much more tunable and serviceable motor compartment.
|
|
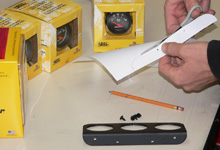
 To keep tabs on the truck I spent so much time getting
in line, these Auto Meter Z-series electronic short-sweep
gauges were perfect. They add a subtle performance tone
to the cab and obvious functionality. Here I am trimming
out my own template to install the bezel underdash. See
Auto Meter sidebar on this page.
To keep tabs on the truck I spent so much time getting
in line, these Auto Meter Z-series electronic short-sweep
gauges were perfect. They add a subtle performance tone
to the cab and obvious functionality. Here I am trimming
out my own template to install the bezel underdash. See
Auto Meter sidebar on this page. |
| |
|
|
 I found a nice location just under the ashtray and secured
the Auto Meter bezel with self-tapping screws.
I found a nice location just under the ashtray and secured
the Auto Meter bezel with self-tapping screws.
|
|

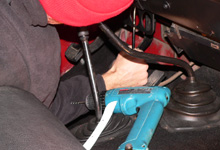
 The oil pressure gauge and water temperature gauge include
their own sending units. In order to install the Auto
Meter water temperature sending unit, a fitting on the
water pump needed to be removed. It took some added leverage
to break loose.
The oil pressure gauge and water temperature gauge include
their own sending units. In order to install the Auto
Meter water temperature sending unit, a fitting on the
water pump needed to be removed. It took some added leverage
to break loose. |
| |
|
|

 The 2-1/16" oil, water, and, voltage gauges were
an appropriate fit for this cab.
The 2-1/16" oil, water, and, voltage gauges were
an appropriate fit for this cab. |
|
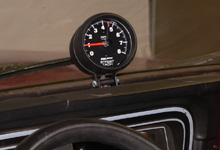
 I know it's a truck but no factory tach even with a four-speed?
I took care of that by installing a matching Auto Meter
Z-series tachometer.
I know it's a truck but no factory tach even with a four-speed?
I took care of that by installing a matching Auto Meter
Z-series tachometer. |