compartment. This means you must seal the package tray area
on most cars. Most individuals find it easier to simply seal
the battery in a box. The box must also also be made from
the steel or aluminum thickness specified earlier, or one
can use an approved composite battery box. As
of this writing the only composite box we know of that is
approved by the NHRA (who uses the FIA's
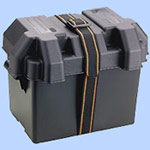
approvals) is Moroso's blue battery box. Do not use one of
these black marine boxes if you plan to take the car racing
as it will not pass inspection. Whichever route you
choose, the battery must be secured with a hold-down bracket
and 3/8" thick (minimum) bolts through the floor. You
cannot just put the battery loose in the box.
In addition to the battery sealing rules you must utilize
a cutoff switch visible from the rear of the vehicle. The
switch has to cut power to the engine and fuel pump when turned
to the 'off' position. This means your alternator and fuel
pump must be powered through the cut off switch so that the
engine cannot keep running under alternator power. On fuel
injected vehicles, since the computer controls the fuel pump
and spark, the engine shuts off by simply killing the battery.
On a carbureted car you'll need to run a wire to the switch,
we've shown you how below.

 Sanctioning bodies like the NHRA have strict rules for
relocating batteries away from the engine compartment.
You either must seal the trunk with 0.032" thick
aluminum or 0.024" thick steel as shown here. All
holes must be sealed, including the package tray area.
Sanctioning bodies like the NHRA have strict rules for
relocating batteries away from the engine compartment.
You either must seal the trunk with 0.032" thick
aluminum or 0.024" thick steel as shown here. All
holes must be sealed, including the package tray area. |
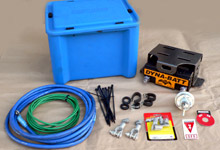
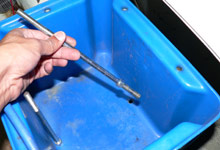
 Moroso offers all of the materials
needed to relocate your battery. Shown is 8 ft of their
2 ga. battery cable, a heavy duty cutoff switch and compression
style battery terminals. The 8 ga. green wire is available
from any hardware store and will be used to wire the alternator
to the cutoff switch. This will ensure the engine doesn't
run off alternator power when the switch is turned off.
Moroso offers all of the materials
needed to relocate your battery. Shown is 8 ft of their
2 ga. battery cable, a heavy duty cutoff switch and compression
style battery terminals. The 8 ga. green wire is available
from any hardware store and will be used to wire the alternator
to the cutoff switch. This will ensure the engine doesn't
run off alternator power when the switch is turned off. |
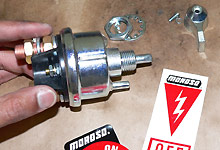
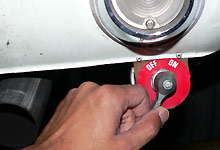
 Moroso's heavy duty battery cutoff switch must be accessible
at the rear of the vehicle to emergency track personnel.
The switch knob can be removed to allow the body to be
mounted behind a panel.
Moroso's heavy duty battery cutoff switch must be accessible
at the rear of the vehicle to emergency track personnel.
The switch knob can be removed to allow the body to be
mounted behind a panel. |
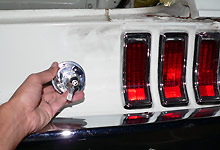
 Most guys simply mount the switch behind the taillight
panel with the knob accessible on the outside. We couldn't
bring ourselves to drill a 1/2" hole in our car
so we searched for other options.
Most guys simply mount the switch behind the taillight
panel with the knob accessible on the outside. We couldn't
bring ourselves to drill a 1/2" hole in our car
so we searched for other options.
|
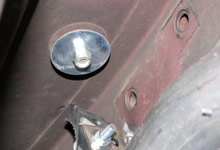
 We settled on riveting a bracket to the bottom of the
rear valence to mount the switch. A relatively noninvasive
approach that we can easily remove should we want to return
the car to stock in the future. Other cool ideas are to
mount the switch in one of the reverse lights.
We settled on riveting a bracket to the bottom of the
rear valence to mount the switch. A relatively noninvasive
approach that we can easily remove should we want to return
the car to stock in the future. Other cool ideas are to
mount the switch in one of the reverse lights. |
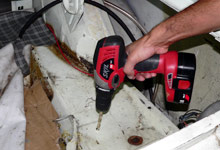
 The next step is to mount the box in the trunk. We suggest
as close to the right wheel as possible. This will help
counter balance the driver's weight and also place weight
over the wheel to increase traction and weight transfer
upon acceleration. The Moroso box is pre-drilled with
two holes in the base. We transcribed those to the trunk
floor and drilled two 3/8" holes. Be sure to avoid
drilling into the fuel tank!
The next step is to mount the box in the trunk. We suggest
as close to the right wheel as possible. This will help
counter balance the driver's weight and also place weight
over the wheel to increase traction and weight transfer
upon acceleration. The Moroso box is pre-drilled with
two holes in the base. We transcribed those to the trunk
floor and drilled two 3/8" holes. Be sure to avoid
drilling into the fuel tank! |
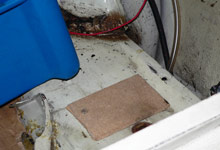
 It may be necessary to use a shim, such as we did with
some 1/4" particle board, to create a level area
to support the box and battery.
It may be necessary to use a shim, such as we did with
some 1/4" particle board, to create a level area
to support the box and battery. |
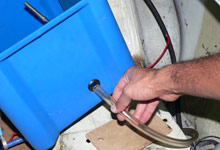
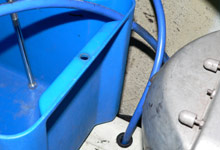
 While our Dyna-Batt sealed lead-acid battery will not
give off fumes, conventional lead-acid batteries do. This
requires the box to be vented to the atmosphere. Moroso
provides the grommet and tube, you need to create the
holes. We used an existing drain hole in the trunk.
While our Dyna-Batt sealed lead-acid battery will not
give off fumes, conventional lead-acid batteries do. This
requires the box to be vented to the atmosphere. Moroso
provides the grommet and tube, you need to create the
holes. We used an existing drain hole in the trunk. |
 Use the two supplied hold down studs to secure the box
to the trunk floor. The threaded sections at the top will
hold the battery down, meeting the NHRA requirement that
the battery be secured to the floor and not just to the
battery box.
Use the two supplied hold down studs to secure the box
to the trunk floor. The threaded sections at the top will
hold the battery down, meeting the NHRA requirement that
the battery be secured to the floor and not just to the
battery box. |
 From under the car we secured the hold down studs with
large flat washers and the supplied Nylock nuts.
From under the car we secured the hold down studs with
large flat washers and the supplied Nylock nuts. |

 There are a couple of ways to attach battery terminals
and ends to the heavy duty 2-gauge cable. One is to use
solder style terminals, and the other is to use these
Moroso compression terminals. We prefer this method because
it allows the terminal to be easily removed in the event
you need to shorten the cable or route it through a panel.
There are a couple of ways to attach battery terminals
and ends to the heavy duty 2-gauge cable. One is to use
solder style terminals, and the other is to use these
Moroso compression terminals. We prefer this method because
it allows the terminal to be easily removed in the event
you need to shorten the cable or route it through a panel. |
 You'll need three sections of cable in all. One to connect
from the battery negative terminal to a chassis ground
- a frame point under the rear of the car is ideal. The
second cable routes from battery positive to the switch
'on' pole. The third section of cable is the longest run,
from the switch 'off' pole to the starter relay in the
engine compartment. The Moroso box is not pre-drilled
for the cables to pass through, you need to do that based
on your battery terminal location. Only drill holes large
enough to pass the bare cable, attaching the terminals
afterwards as shown. This will ensure a tightly sealed
box.
You'll need three sections of cable in all. One to connect
from the battery negative terminal to a chassis ground
- a frame point under the rear of the car is ideal. The
second cable routes from battery positive to the switch
'on' pole. The third section of cable is the longest run,
from the switch 'off' pole to the starter relay in the
engine compartment. The Moroso box is not pre-drilled
for the cables to pass through, you need to do that based
on your battery terminal location. Only drill holes large
enough to pass the bare cable, attaching the terminals
afterwards as shown. This will ensure a tightly sealed
box. |
 Route the battery positive and negative cables through
the trunk floor. We found existing factory holes that
we could use. Be sure to use a rubber grommet as shown.
Route the battery positive and negative cables through
the trunk floor. We found existing factory holes that
we could use. Be sure to use a rubber grommet as shown. |
 The negative cable should be grounded solidly to a frame
member. We were able to use one of many existing threaded
bosses in the frame member at the rear of the vehicle.
The negative cable should be grounded solidly to a frame
member. We were able to use one of many existing threaded
bosses in the frame member at the rear of the vehicle. |
 The other cable from the battery box will connect the
battery positive terminal to the switch 'on' pole.
The other cable from the battery box will connect the
battery positive terminal to the switch 'on' pole. |
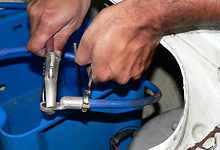
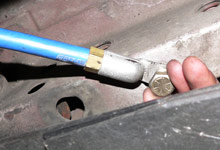
 The long run of cable will connect from the 'off' pole
to the constant 12V side of the starter solenoid. We are
also running a 8 Ga. wire (green) along side the main
power cable as this wire will tie in to our alternator
power wire. This way when the switch is turned to 'off'
the alternator power is also killed, shutting down the
motor.
The long run of cable will connect from the 'off' pole
to the constant 12V side of the starter solenoid. We are
also running a 8 Ga. wire (green) along side the main
power cable as this wire will tie in to our alternator
power wire. This way when the switch is turned to 'off'
the alternator power is also killed, shutting down the
motor. |
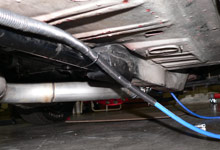
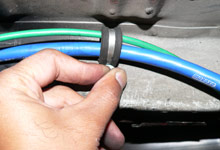
 Securely route the cable under the car and away from any
moving components or exhaust pipes. We used split wire
loom to protect the wire from cuts and chaffing that could
result in a short. Sub-frame connectors make for a nice
routing of the cable.
Securely route the cable under the car and away from any
moving components or exhaust pipes. We used split wire
loom to protect the wire from cuts and chaffing that could
result in a short. Sub-frame connectors make for a nice
routing of the cable. |
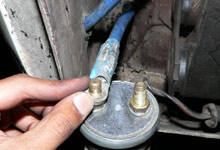
 Once in the engine compartment we connect the cable to
the constant 12V starter solenoid terminal. The alternator
wire connects to
Once in the engine compartment we connect the cable to
the constant 12V starter solenoid terminal. The alternator
wire connects to |
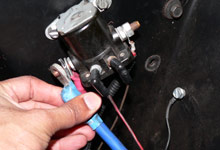
 The cable is pulled up into the engine compartment and
secured away from the headers or moving parts. The connection
is made to the starter relay.
The cable is pulled up into the engine compartment and
secured away from the headers or moving parts. The connection
is made to the starter relay.
|
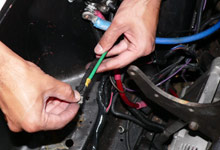
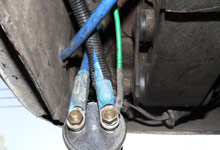
 To connect the alternator to the cutoff switch we simply
took the two factory alternator "feed" wires
that normally connect to the battery side of the starter
relay and connected them directly to the green 8 Ga. wire.
We taped up the connection to avoid shorts.
To connect the alternator to the cutoff switch we simply
took the two factory alternator "feed" wires
that normally connect to the battery side of the starter
relay and connected them directly to the green 8 Ga. wire.
We taped up the connection to avoid shorts. |
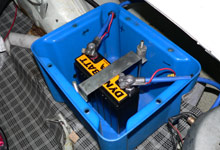
This is what the final installation looks like. The hold
down bar must be installed to keep the battery securely
strapped to the trunk floor. |
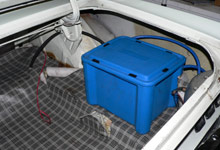
The Moroso lid seals the battery. This is an NHRA compliant
battery-in-the-trunk setup that will pass any track inspection.
|