How to Make Roller Spring Perches Images and conversion courtesy
Day Scovel
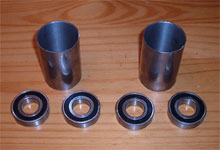
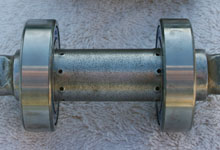
The raw materials required for the roller perch modification
are four R142RS sealed ball bearings and 2" diameter,
15-gauge steel tubing. The tubing is cut to 3"
lengths and serves as the bearing housing. The R142RS
bearings used are a fairly common sealed roller bearing,
often used in roller skate wheels and other routine
applications. The 1/2" thick bearing has a 7/8"
inner diameter and 1 7/8" outer diameter. The bearing
and tubing kit can be purchased from Day's website.
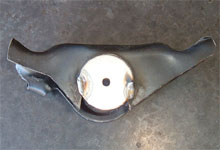
You can convert your existing perches (see page 2 for
removal instructions) or use a new or used set. Either
way they need to be taken apart.
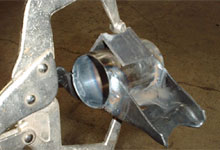
The first step is to hammer or press out the mounting
bolts. Then the shaft needs to be separated from the
rubber and removed. We've seen this done any number
of ways, such as using a propane torch to burn out the
rubber. The method most efficient is to cut the tube
lengthwise, pry it open, and pry the shaft and bushing
out. Finally, remove the bushing tube Upon close inspection
you'll notice one side of the bushing tube is "swedged"
into the perch.
A hardware store 1 7/8" washer is tack
welded to the perch to serve as a pilot for the hole
saw. Position the washer slightly below the "fold"
in the perch to ensure the bearing tube clears the underside
of the perch by 1/8" to 1/4".
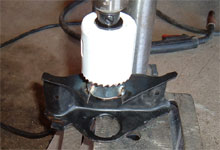
A 2" hole saw is used to cut holes in the perch for
the bearing tube. Use a drill press to keep the holes
aligned.
Prior to welding up the journal, we'll mock up the shaft
and bearings in the perch in order to measured where the
bearings with sit on the shaft. The bearings should sit
centered on the wall of the perch for maximum strength.
With the shaft centered measure the distance from the
outside of the shaft to the center of the bearing.
Using the measurements in the previous step, use a sharp
pointed punch to peen the circumference of the shaft at
four to eight points.The divits will prevent the bearing
from walking inward on the shaft. Day recommends creating
a jig out of angle iron to keep the shaft from turning.
The 3" section of pipe can now be squared up in the
openings and welded into position. Weld both the outside
and inside edges of the perch for maximum strength.
A sanding roll is used to knock down and welds which have
penetrated through the tubing wall. Finally a light touch
with a brake hone may be used to true the journal back
to a uniform inner diameter. Test fit the bearing to ensure
proper fit and avoid removing too much material. This
is also a good time to prime the perch for painting.
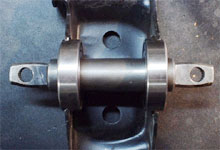
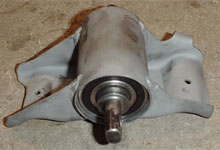
The shaft and bearings are now ready to be installed in
the modified perch. Once assembled, the very edge of the
bearing tube is carefully rolled over with a hammer to
lock the bearing in position.
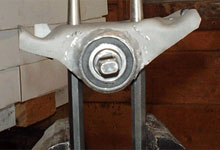
The final step is to squeeze the center of the tube to
create clearance for the shock studs. This can be achieved
by positioning the perch on two long punches and slowly
squeezing in a vice as show.