|

Stop the Presses
Just as we were putting the final touches on our June '05
issue we came across this stunning beauty, a 1989 F-150 with
a 5.0L motor and AOD transmission. Our intent was to simply
pickup a cheap beater truck to use around the FM shop for
making Pick n' Pull runs and hauling motors. However when
the opportunity presented itself to own, for dirt cheap, what
is essentially a Mustang with an 8ft. bed, we scratched our
collective chins and realized this could make for a pretty
fun project. In fact the more we thought about the possibilities
of hopping up a big and ugly work truck the more excited we
got. So rather than hold off and introduce the truck next
month we scrambled together in the last few days to make some
initial mods just in time for this issue.
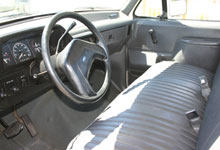
This F-150 served most of it's life as a commercial duty truck.
It's eggshell white paint is permanently stained with greasy
jobsite fingerprints. The bed showed plenty of evidence of
the loads it's been subjected to fortunately we scored a Ford
bedliner for $40 so we threw it in for looks. The truck is
all about utility, from it's vinyl bench seat and floor to
it's headliner-delete and lack of power anything. If indeed
this were a Mustang it'd be highly sought after, as the lack
of accouterments means weight savings, hence better power
to weight ratio. Of course when you're talking about a long-bed
truck with dual fuel tanks, weight is a moot point. It's heavy
as it should be. Our goal is to pump up the 185 horsepower
(factory rating) 5.0L motor so that at the very minimum we
give a few fart-can imports a good beating.
 From
the Five-Point-Oh Playbook From
the Five-Point-Oh Playbook
Other than the fact we need a step stool to look into the
engine compartment, the underhood of this truck is as familiar
as any Fox-body Mustang we've worked on. It's got the venerable
5.0L powerplant, fed by a sequential electronic fuel injection
system. The engine management is however based on a speed
density system, and the cam and intake are all set up for
low-end grunt, hence a whopping 160 rear wheel horsepower
is all this truck can muster. We'll shoot for a 100 horsepower
gain in the coming months, namely with the plans calling for
a cylinder head and intake swap. We may likely convert to
the more versatile mass-air system to allow for a cam change.
That's all in the near future. For now, however, there are
considerable modifications and performance enhancements to
make before getting into the serious bolt-on's. Below we've
outlined the initial steps - a proper tune up and a K&N
air-intake system. In the next installment of this project
we'll detail some exhaust system modifications. Also in the
next issue you'll get all the dyno results of each change.
Heck, we'll even give you a report on how it fares at the
local Wed. night bracket racing.
Hot Sparks
With any project car we like to start out with first identifying
and addressing any problems. In this case all the 127,000
miles motor need was a tube of BarsLeak radiator sealant to
stop a small radiator leak, and then a good tune up. A set
of plugs, wires, cap, and rotor would have sufficed, but our
experience with 5.0L's is they tend to pick up some torque
and throttle response with a hotter ignition. The usual ignition
system upgrade is wiring in an MSD 6AL box, however we felt
that was overkill for a beater truck. Instead we opted for
the FirePower ignition kit from Performance Distributors.
The kit consists of their hefty 10mm LiveWires, brass terminal
cap and rotor, along with their Screamin' Demon coil and DynaMod
TFI module. The coil enables a hotter spark and the TFI module
is engineered to provide a longer spark dwell time. As a result
spark plug gaps can be opened up to 0.060". We measured
as much as 10 lb-ft of torque off-idle and vastly crisper
throttle response over the stock replacement system.
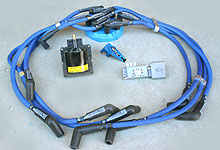
 Shown is the FirePower ignition kit. Inclued are 10mm
LiveWires, a cap and rotor, as well as Performance Distributors
Screamin' Demon coil and DynaMod TFI module. Just add
a fresh set of plugs and you have a robust ignition system
for under $250.
Shown is the FirePower ignition kit. Inclued are 10mm
LiveWires, a cap and rotor, as well as Performance Distributors
Screamin' Demon coil and DynaMod TFI module. Just add
a fresh set of plugs and you have a robust ignition system
for under $250.
|
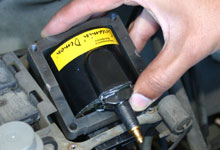
 We ditched the 15 year old stock coil and put in the hotter
Screamin' Demon into the factory bracket. The hotter coil
features a non-corrosive brass terminal. We opened up
our plug gaps to 0.055" for a fatter spark.
We ditched the 15 year old stock coil and put in the hotter
Screamin' Demon into the factory bracket. The hotter coil
features a non-corrosive brass terminal. We opened up
our plug gaps to 0.055" for a fatter spark. |
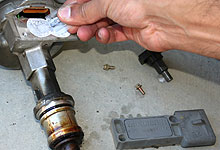
 The distributor needs to be removed to access the TFI
module screws. Remove the stock unit and apply some thermal
grease to the contact surface.
The distributor needs to be removed to access the TFI
module screws. Remove the stock unit and apply some thermal
grease to the contact surface.
|
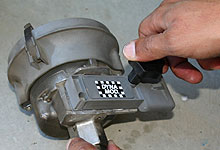
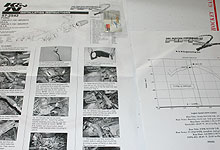
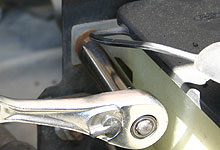
 The DynaMod module is plugged into
the distributor and secured. Note the special TFI module
wrench. A standard 5.5mm socket will not fit in the holes.
Lisle makes the wrench, which sells for under $5 at most
auto chains.
The DynaMod module is plugged into
the distributor and secured. Note the special TFI module
wrench. A standard 5.5mm socket will not fit in the holes.
Lisle makes the wrench, which sells for under $5 at most
auto chains. |
 The firing order on early 5.0L truck engines is 1-5-4-2-6-3-7-8,
and not the typical H.O. order of 1-3-7-2-6-5-4-8.
The firing order on early 5.0L truck engines is 1-5-4-2-6-3-7-8,
and not the typical H.O. order of 1-3-7-2-6-5-4-8.
|
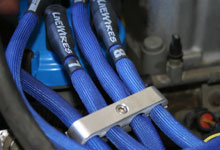
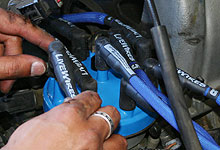
 The big LiveWires will not fit
in the stock wire looms. Performance Distributors sells
billet
loom kits to nicely route their wires.
The big LiveWires will not fit
in the stock wire looms. Performance Distributors sells
billet
loom kits to nicely route their wires. |
More Air
With any Ford engine you are all but guaranteed to free
up some horsepower by addressing the restrictive air intake
system. The F-150 sucks in air via a tiny rectangular scoop
mounted on top of the radiator support. This feeds into a
a 1"x5" opening in the air-box. A replacement K&N
panel filter would have done this truck wonders as the stock
paper filter was filled with crud and dirt from trips onto
unpaved jobsites. However perusing K&N's website revealed
a full FIPK (fuel injection performance kit) for the F-150.
The FIPK consists of a big conical air filter, heat sheild,
and custom molded tube.
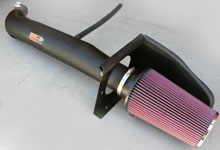
K&N's FIPK kit for '88-'95 F-150/Broncos works on
with either the 5.0L or 5.8L engine options.
|

Loosen a couple hose clamps at the throttle body and remove
the air-box retaining screws. |
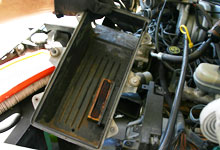
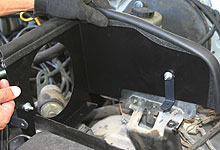
Disconnect the PCV tube and lift out the factory air-box.
The factory PCV breather tube can also be removed, it
is replaced with the hose included in the FIPK kit. |
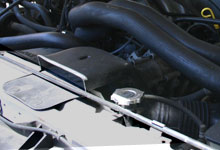
The factory air-box is fed via this rectangular inlet
and duct. The K&N instructions leave this in-place
to allow for some cold air to enter the filter area.
|
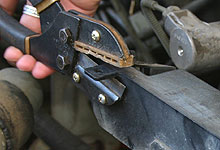
Trim off these tabs from the relay bracket. They aren't
used on most applications, so there is no harm in removing. |
Remove this nut from the coolant reservoir. The head shield
will connect to here using the same nut. |
 With trim and brackets mounted to the heat shield, lower
it into place. Attach with one of the air-box screws and
the nut removed in step 2.
With trim and brackets mounted to the heat shield, lower
it into place. Attach with one of the air-box screws and
the nut removed in step 2. |
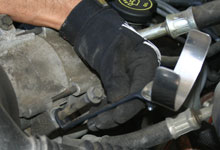
 Assemble the tube support bracket and secure under the
A/C bolt as shown. K/N has specific instructions for trucks
without A/C.
Assemble the tube support bracket and secure under the
A/C bolt as shown. K/N has specific instructions for trucks
without A/C. |
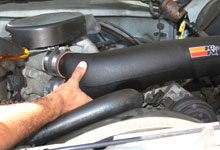
 Connect the molded tube to the throttle body using the
supplied silicone sleeves and hose clamps.
Connect the molded tube to the throttle body using the
supplied silicone sleeves and hose clamps. |
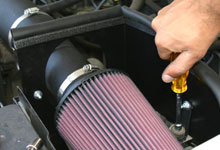
 Attach the conical K&N air filter to the end of the
tube and secure the hose clamps.
Attach the conical K&N air filter to the end of the
tube and secure the hose clamps. |

|