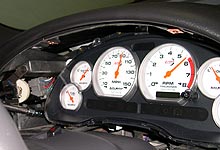
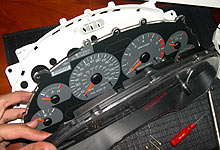
| Installation
(cont): Autometer Lunar Intrument Cluster |
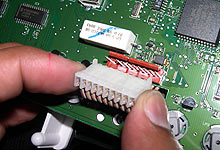
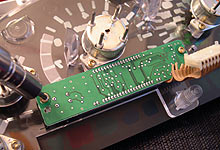
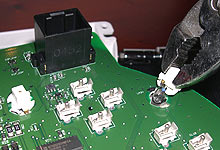
 Carefully disconnect the digital
odometer connector from the board pins.
Carefully disconnect the digital
odometer connector from the board pins. |
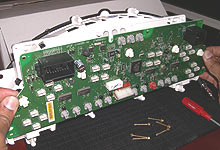
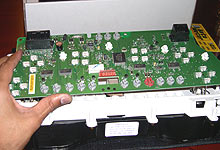
 Separate the circuit board from
the gauge assembly. Gently pry with your fingers from
all sides until it is free from the connector pins.
Separate the circuit board from
the gauge assembly. Gently pry with your fingers from
all sides until it is free from the connector pins. |
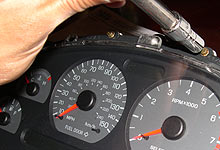
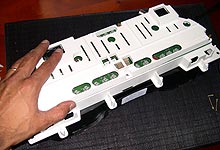
 Turn the gauge cluster over and
remove eight T-15 screws around the lens.
Turn the gauge cluster over and
remove eight T-15 screws around the lens. |
 Separate the lens, gauge panel
and white housing.
Separate the lens, gauge panel
and white housing. |
 Remove the two T-10 Torx screws
which secure the digital odometer in position behind the
stock gauge face.
Remove the two T-10 Torx screws
which secure the digital odometer in position behind the
stock gauge face. |
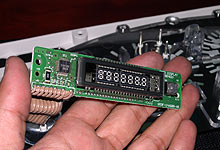
 All your odometer information is
retained in this module and every last tenth will transfer
to the new gauges.
All your odometer information is
retained in this module and every last tenth will transfer
to the new gauges. |
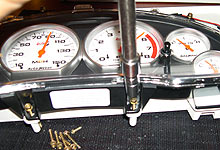
 Using the supplied screws, attach
the digital odometer to the new Autometer gauge panel.
Note the cable side is at the bottom.
Using the supplied screws, attach
the digital odometer to the new Autometer gauge panel.
Note the cable side is at the bottom. |
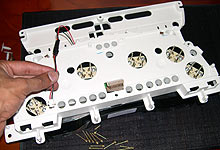
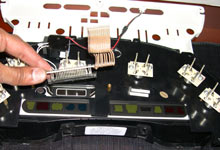
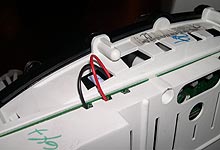
 Place
the white housing on to the instrument cluster, making
sure the red and black wires pass though the hole in the
top of the cover as shown.
Place
the white housing on to the instrument cluster, making
sure the red and black wires pass though the hole in the
top of the cover as shown. |
 Reattach the eight T-15 screws
to secure the new instrument cluster to the housing.
Reattach the eight T-15 screws
to secure the new instrument cluster to the housing. |
 Place the circuit board on to the
gauge pins and carefully engage it until it is seated
against the housing. Note, the odometer cable needs to
pass through the opening.
Place the circuit board on to the
gauge pins and carefully engage it until it is seated
against the housing. Note, the odometer cable needs to
pass through the opening. |
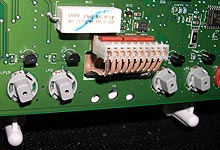
 Reconnect the odometer cable to
the pins on the board. Ensure it snaps into place behind
the orange clips.
Reconnect the odometer cable to
the pins on the board. Ensure it snaps into place behind
the orange clips. |
 Using pliers, remove the five bulbs
in the board by turning them 1/4-turn counter clockwise.
Using pliers, remove the five bulbs
in the board by turning them 1/4-turn counter clockwise. |

 Plug the new lamp connector into
the 2nd empty lamp socket from the left.The red wire must
face the top of the cluster.
Plug the new lamp connector into
the 2nd empty lamp socket from the left.The red wire must
face the top of the cluster. |
 Attach the back cover using only
five of the six remanining T-15 screws. Do not use a screw
in the lower center hole (arrow.)
Attach the back cover using only
five of the six remanining T-15 screws. Do not use a screw
in the lower center hole (arrow.) |
 Make certain the lamp wires are
not pinched between the housing covers.
Make certain the lamp wires are
not pinched between the housing covers. |
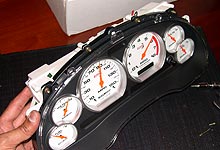
 The final gauge cluster is ready
to be placed back in the vehicle, simply follow steps
1-7 in reverse.
The final gauge cluster is ready
to be placed back in the vehicle, simply follow steps
1-7 in reverse.  |