Nevertheless we tried to work
with the combination. We got the car to the track for
a baseline with the stock mass air sensor and 19lb injectors.
The result was a very disappointing 13.46 at 103.7. We
weren't quite ready to roll the car off a cliff, since
we knew that the motor was not getting the proper amount
of fuel.
We came back a few weeks later with the 24lb injectors
back on the car (they tested out okay), a matching 76mm
C&L, and an adjustable fuel pressure regulator
(AFPR). We played around with fuel pressure and found
the car produced the best ET with about 38lbs in the rails.
We were now down to 13.29 with a trap speed of 105. Still
running on very worn Nittos, the 60ft was far from optimal
at 1.87.
Fuel System Upgrades
The stock 5.0L Mustang fuel system consists of an 80lph
(liter per hour) in-tank fuel pump, nonadjustable pressure
regulator, and 19lb. injectors. This is good enough
to support 250-275 flywheel horsepower, or basically
your typical bolt on modifications without heavy induction
mods. Once you get into better breathing heads and a
cam, around the 300-350 horse range, the fuel system
must be upgraded to 24 or 30lb injectors. This means
the fuel pump, injectors,mass air, and an adjustable
fuel pressure regulator. You really can't do without
all three.
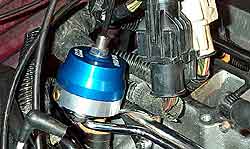
Injector and AFPR installation
We installed a set of good used 24lb. injectors (blue
tops) and a regulator. Installation is straight forward.
Depressurize the fuel rails by depressing the schrader
valve. It is not necessary to disconnect the fuel
lines from the injector rail.
Next remove the upper intake manifold and associated
vacuum lines. Now you can remove the four fuel injector
rail screws and slowly pry the rail and injectors
out of the manifold ports. Remove the old injectors,
making sure not to leave any O-ring behind in the
rail or the manifold.
With the injector rail up and off the manifold, remove
the three Allen screws which hold the stock regulator
to the rail. Then install the new regulator and O-ring
and secure with the same Allen screws.
Put a little petroleum jelly or Vaseline on the new
injector O-rings and place them into the rail ports.
With all eight injectors on the rail, carefully line
up the injectors in the manifold ports, and use light
pressure to force the rail and injectors into place.
Replace the rail retaining screw.
Fuel Pump Installation
While we could get fuel pressure to 38psi. the car
seemed sluggish at WOT, as if the stock fuel pump
was not keeping up with the demand. So we made the
$100 upgrade to a Walbro 190lph replacement pump.
Installation of the pump is straight forward. Drive
until the fuel level is at empty. Depressurize the
fuel rails at the schrader valve, and disconnect the
battery. Jack the rear of the car as high as possible,
and remove the tank straps. Lower the tank carefully,
disconnecting the electrical connectors and two fuel
lines necessary to allow the tank to drop. Eventually
you'll need to pull the tank off the filler tube.
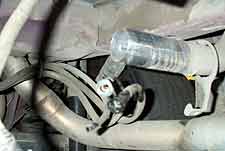
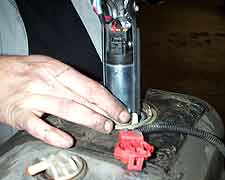
The pump assembly is accessed from the top of the
tank, secured by a circular retaining ring. Use a
brass punch to knock the ring loose and then pull
the pump out.
Decision Point At this point we
were pretty much at a crossroad. On one hand we were leaning
towards putting the stock cam back in. It would be the
simplest
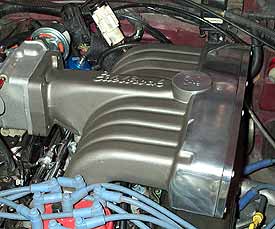
We
obtained a good used (and partially polished!) Edelbrock
Performer upper intake manifold. The difference
between it and the RPM is the Performer features
longer runners. Edelbrock rates its range from idle
to 5500 rpm, whereas the RPM intake is rated at
1500-7000 rpm. Both models utilize the same lower
intake. The runner length influences the resonant
tuning effect of the intake charge, which effects
the torque characteristics of the engine. The longer
the runner the greater the low end torque.
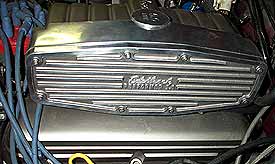
The Performer we obtained
is an older model, which features a cool ribbed
"vintage" style plenum cover. However
the older design utilizes a bolt inside the plenum
to mount to the lower intake. A little patience
and stubby wrench is required to tighten the bolt.
way to eliminate all the driveability
problems. By the way, the other two criteria -fuel economy
and emissions, were satisfied. Even with the idle and
bucking quirks, the motor was delivering 17-18mpg over
a typical weekly commute, and that would surely be around
20mpg on a sustained 300+ mile drive. With the catalytic
h-pipe the car passed emmissions with flying colors, putting
out nearly zero hydrocarbons! See the full test results
in our article
on the catalytic h-pipe. However not wanting to give
up so quickly, the other option was to first get the driveability
back by obtaining a Performer upper intake. Fortunately
we located one locally and in a matter of hours we had
the RPM upper removed and the Performer upper in its place.
(The nice thing about the two Edelbrock intakes is that
they share the same lower intake, making the swap a matter
of minutes.)
Bingo! The first 100 yards of driving confirmed our suspicions
that the Performer intake, rated at idle to 5000 rpm,
is a better match for our engine combination. The off-idle
torque was now abundant, and suprisingly we noticed no
significant top end loss. The idle and bucking were not
improved, lending more support to our theory that the
stock mass-air voltage transfer functions in the EEC must
be modified to the match the load of the new engine combination.
(The EEC processor contains tables which correlate voltage
from the mass air sensor to air-flow in kg/hr. We were
stunned with the improvement in driveability. Fifth gear
passing on the freeway was now possible, whereas with
the RPM intake we found ourselves having to downshift
into fourth in order to avoid a spongly, responsless,
throttle until the tach hit 3000 rpms.
More Track Results Of course the ass-meter has failed us many a times
in the past, and the only way to corroborate our feelings
for the Performer would be to get
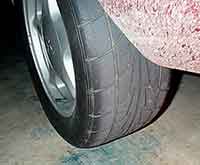
In line with keeping
the car a daily driver, we went with Nitto drag
radials (245-50R16). At 30psi they function as well
as a radial on the street. At 15-18psi at the track
they hook as well as a cheater slick. Besides, it's
nice to sip a Coke in the pits while your buddies
are sweating to get their wheels swapped!
back to the track. So we did...
The first run of the day was a gut wrenching 13.80 at
106 mph. No need to panic though, the numbers told the
secret. Wheelspin, or a slipping clutch, resulted in a
horrible 2.16 60ft. Yet the mph was over 1mph higher than
our previous best with the RPM intake. There was potential
in those numbers.
We lined up again, reducing the pressure in the Nitto
drag radials to 17 psi and bringing the launch down to
3000, this time a 1.80 short time flashed the board, soon
followed by a 8.33 1/8th mile ET. As the driver of the
car I can tell you that when you see an 8-tenths reduction
in ET just at the halfway point, it's easy to lose concentration
and screw up the 3-4 shift. Fortunately I didn't, and
the timeslip confirmed the joy, as we just knocked off
a 12.97 @ 107.8
Two more runs followed and we ended up improving to 12.85
@ 108.2 on 1.76 60ft!
So where are we at now?
The Performer intake was hands down the key to the performance
puzzle here. The latest track results show a clear gain
in power across the board. Without getting the car on
the dyno it is hard to say how much power the Performer
makes versus the RPM, but we are pretty confident that
what we'd see is the RPM making perhaps a few more peak
HP at a higher rpm, however the Performer will have
a flatter, broader torque curve, which calculates into
more average horsepower...and that is what counts in
a street car.
The driveability issues are still not completely resolved.
In order to live with this cam in a daily driver we
must resolve the low speed bucking, and choppy idle,
problems. A custom chip, or perhaps playing around with
one of several aftermarket EEC tuning software, will
make this engine the perfect all around street-strip
daily driver.
Posted by prw512, 09/10/11 09:01pm: your problem is the cam 112 ls is bad you sould try 114 ls
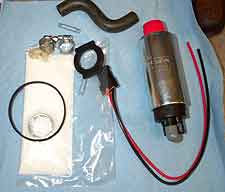
Fuel System Upgrades The Walbro 190lph kit includes
new connector, filter, hose, and rubber tank seal. The kits
are universal fit, meaning there are minor mods to make. For
one, don't use the tank seal since it's a square cut and the
stock one is round. The square cut will leak. Secondly, the
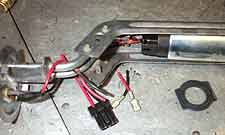
rubber hose needs to be shortened to match the stock hose
(shown in lower pic.) Finally the stock connectors are simple
spade lug style, they will need to be transferred over to
the new pump.