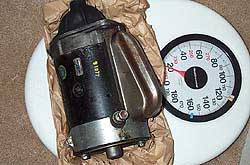
| Installation |
 |
|
 |
| 1.
Begin by disconnecting the negative battery cable. Then remove the
stock starter. You'll need a 1/2" wrench or socket to remove
the two bolts holding the starter to the bellhousing. Once the starter
is free, drop it down slightly and then remove the nut which holds
cable to the starter post. |
|
2.
The stud on the new starter is slightly larger than stock, requiring
the cable end be enlarged to 5/16". We simply held the cable
against one of the many holes in the k-member and attacked it with
a drill. You may wish to use a file to clean up any rough edges. |
 |
|
 |
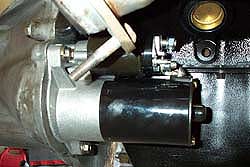
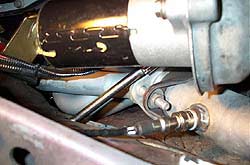
| 3.
The new starter can now be bolted up to the bellhousing. Due to
the confined space under the car, with headers and the k-member,
we found it easier to connect the wiring to the starter solenoid
before bolting it up to the bellhousing. |
|
4.
The starter cable mounts to the single large 5/16" stud, while
the #12 ga. red wire is connected to the outer of the two smaller
terminals. Shown here is the PMGR starter for larger 164 tooth flywheels,
as we have in our Project '67. |
 |
|
 |
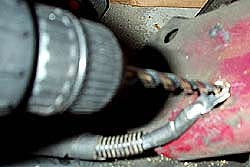
| 5.
The upper mounting bolt can be tough to get a wrench on, especially
with headers in place. We used long extension with a swivel socket
and snaked it through the k-member. |
|
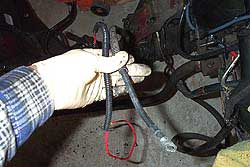
6.
Route the red wire along side the starter cable, using zip-ties
and wire loom to prevent it from chaffing or grounding out against
the motor, frame or accessories. |
 |
|
 |
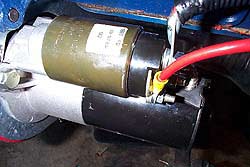
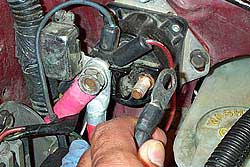
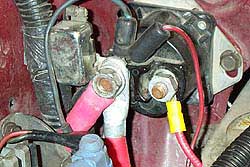
| 7.
With the starter mounted, all that is left is to change around the
wiring at the starter relay. Disconnect the starter cable from the
post on the starter relay. With the new PMGR starter, the starter
cable attaches to the 12V side of relay, however as evident in this
photo, we did not have enough room on the stud due to the other
wiring in place. |
|
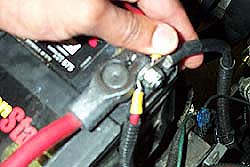
8.
Rather than find a new relay with a longer stud (rumored to be available
at Pep Boys) we simply attached the starter cable directly to the
positive cable at the battery, using the clamp stud as shown. This
will not cause any problems with the starter operation. The other
wire in our picture is for the electric fan. Do NOT attach the red
lead from the starter directly to the battery. |
 |
|
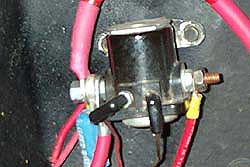 |
| 9.
The #12 ga. red wire included with the PA Performance starter is
attached to cranking side of the relay, where the starter cable
was originally attached. You shouldn't have any other wires on this
stud, as it only receives 12V when the key is in the start position.
|
|
10.
On early Fords the starter relay looks slightly different, but operates
in the same way. Move the original starter cable to the constant
12V side (same side as the battery cable.) The red power lead for
the new mini-starter is connected to the opposite side as shown. |
|
|
|
|


