 |
 |
 |
|
 |
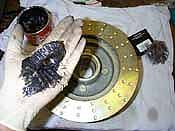
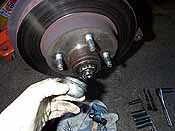
| 1.
The new rotors come with the bearing races pressed in, so
its a good idea to pick up some new bearings. Start by packing
the new bearings with high-temp disc brake grease. The procedure
is to put a glob of grease in your palm and scrape the bearing
across, forcing grease between the rollers. |
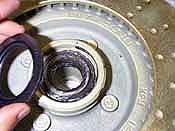
2.
The greased inner bearing is set in the rotor and a new seal
is tapped into place. The outer bearing will be installed
when the rotor is on the spindle. |
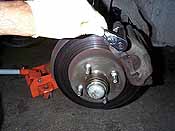
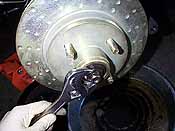
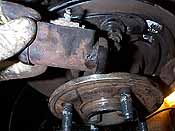
3.
Begin disassembly of the old brakes by removing the two caliper
pivot bolts. Unless you plan to replace the calipers, do not
detach the brake line. However you may want to replace the
rubber line at this point, especially if it is cracked. Old
rubber lines flex, resulting in a mushy brake pedal. |
 |
 |
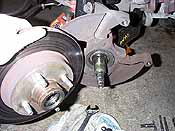 |
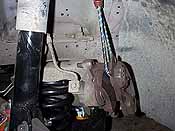
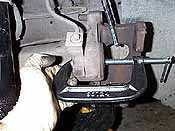
| 4.
Support the caliper so that is does not hang from the brake
hose. We used a small bungy cord and hung the caliper from
one of the holes in the shock tower. |
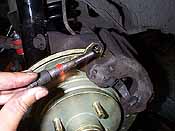
5
Remove the dust cap, cotter pin, and nut from the rotor.
|
6.
Slide the rotor off the spindle. |
 |
 |
 |
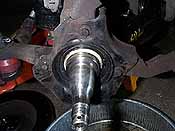
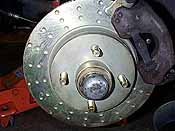
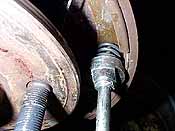
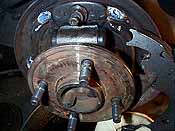
| 7.
Clean off any old grease from the spindle and inspect it for
grooves, nicks, or rust. If it is damaged you should consider
replacing the spindle as it will lead to accelerated bearing
wear. |
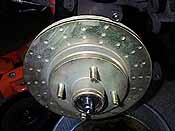
8.
A trick to increase cooling of the front brakes is to trim
the dust shield as shown here. You'll need to remove the shield
from the spindle (three screws) and trim it around the mounting
holes using tin-snips. You cannot leave the dust shield off
entirely because the cupped portion keeps dirt out of the
inner bearing. |
9.
Coat the spindle with new grease and slide the new rotor on
carefully. Pack the outer bearing with grease and slide it
into the rotor. |
 |
 |
 |
10.
Replace the retaining washer and nut and adjust the bearings.
The proper procedure is to turn the rotor while tightening
the nut to approximately 20 lb.ft. Then back the nut 1/4 turn
and line up the cotter sleeve and pin. The rotor should not
have any play in it, but should not bind when you try to spin
it. (Expect it to spin about 1 revolution before coming to
a stop.)
|
11.
Before installing the new pads, use a large C-clamp to push
the piston into its bore, otherwise you'll have a tough time
getting the caliper over the rotor. |
12.
Set the new pads into the calipers. We used the metallic pads
from GTRotors, however any semi or full metallic pad will
perform well with rotors. (See brake pad
basics.) We did not use any anti-squeal compound ("blue-goo"),
but you can if you feel your calipers are prone to squeaking.
|
 |
 |
 |
| 13.
Clean the rotor with brake cleaner to remove and grease and
oil from your hands, then slip the loaded caliper over the
rotor and install the pivot bolts. Use a light coating of
white lithium grease on the pin, and a small dab of RTV silicone
or Loctite on the threads. |
14.
The finished front brakes look great. We'll bleed them after
the rear drums are completed. |
15.
With the car supported on jack stands and front wheels
chocked, slide the drums off the rear axle. (The parking brake
must be released.) |
 |
 |
 |
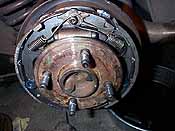
| 16.
The best way to work on drum brakes, with all the complex
springs, is to work on one side at a time, using the other
side as a reference. A shop manual is also a good idea. |
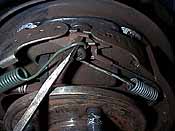
17.
Start disassembly be removing the side springs which secure
the shoes to the backing plate. Note the special brake tool
we are using -it is cheap (under $10) and will save you a
lot of aggravation so pick one up. |
18.
Then remove the two springs shown be prying them off the mounting
pin with a large screwdriver.
The shoes can then be removed from the backing plate. |
 |
 |
 |
| 19.
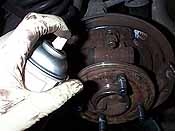
Use brake cleaner to thoroughly clean the backing plate. Drum
brakes collect a lot of brake dust, be sure to clean it all
out. |
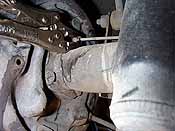
20.
Since we were replacing the wheel cylinders, we disconnected
the rear brake lines. Be careful not to round off the fitting
-use a flare wrench or vise grips. |
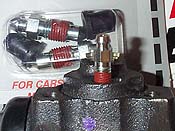
21.
Our wheel cylinder was in bad shape. The cylinders get packed
with brake dust which causes them to leak, and bind. |
 |
 |
 |
| 22.
Install the new wheel cylinder and shoes. Be sure to reattach
the springs in the correct order. Use the repair manual and
the other side as a reference. |
23.
Adjust the parking brake adjuster so that the drum just barely
slips over the shoes without using any force.
|
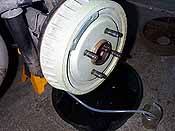
24.
Clean the machined drum surface with brake cleaner to remove
any grease before placing the drum over the shoes. |
|
 Bleeding
the brakes Bleeding
the brakes
Start by filling the reservoir with quality brake fluid, we
recommend DOT 4 or DOT 5.1. See below for
more on brake fluids.
Bleeding the brakes is a snap with the Speed Bleeder screws.
Attach a clear silicone hose (available from SpeedBleeder)
to the screw and a jar to collect the fluid. Starting with
the wheel furthest from the master cylinder, in most cases
this is the passenger-side rear. Then do the drivers rear,
pass. front, and finally the drivers front caliper. Simply
loosen the bleed screw one turn, and slowly pump the brake
pedal to the floor ten to fifteen times, or until you see
clear fluid flowing without any air bubbles. There is no need
to have someone close the screw while the pedal is depressed.
The valve in the screw prevents siphoning, so you can walk
back and tighten the screw yourself!
Always ensure the reservoir has fluid, if it goes empty you'll
pump air into the lines and have to start all over! |
|
|
|
Breaking in the brakes
New brake pads need to be "bedded", a process
which cooks off the binder resins in the pad by deliberately
over heating the pad. If you don't do this, the first time
you decide to panic stop the brakes will fade big time and
you'll probably hit whatever you were trying to avoid.
Drive at about 50-60 mph (on a safe. open, road) and apply
the brakes, dragging them while giving the car gas to maintain
the speed. Drag the brakes for about 10 seconds and release.
Drive for about one minute off the brakes to let them cool,
then drag the brakes again for thirty seconds. The brakes
may begin to smoke, chatter, and stink and you might feel
a some fade, this is normal. Repeat this up to three times,
then let the brakes cool for several minutes. Finally, make
some hard stops from 40, then 50, then 60 mph, allowing
the brakes to cool a couple minutes between each stop. You
should feel the brakes progressively feel better and stop
faster. Be sure to check the reservoir and bleeder screws
to ensure there is no leaking of brake fluid.
|
|
|
|
Brake
Fluid Basics
Two types of brake fluid are commonly used in the automotive
world. The most common type uses a Poly Glycol Ether, the
other uses a Silicone or Silicium-based Polymer. Both Fluids
are common but perform and feel different. Fluids containing
Polyalklene Glycol Ether are more widely used and are the
only fluids that should be used in racing brake systems.
Silicone based fluids are used where introduction of water
into the braking system if of high concern, such as with
military vehicles. Silicone based fluids are non-hydroscopic
meaning that they will not absorb or mix with water, however
silicone fluids compress more than poly glycol ether types,
which leads to poor, "spongy" pedal feel. We don't
recommend silicone fluids, unless you have a show car -silicone
fluids don't eat up paint.
Poly glycol ether fluids are hydroscopic meaning they have
an ability to mix with water and still perform adequately.
However, water will drastically reduce the boiling point
of fluid which can lead to fluid fade. In fact they are
so hydroscopic that they fluid will pull moisture out of
the air, which is why it is imperative to use fresh brake
fluid and never keep the master cylinder cover open for
a long period of time. These fluids are not easily compressible
and give much better feel over silicone types.
Water eventually enters the brake system in several ways.
As calipers, wheel cylinders, and brake lines heat up and
then cool repeatedly, condensation builds up in the system.
Diffusion is another way in that moisture may enter the
system. Diffusion occurs when over time moisture in the
atmosphere enters through rubber brake hoses. The use of
hoses made from EPDM materials (Ethlene-Propylene-Diene-Materials),
or steel braided lines with Teflon sleeves will reduce the
amount of diffusion.
All brake fluids must meet Department of Transportation
(DOT) minimal specifications for brake fluid. Keep in mind
these are minimal standards, and usually manufacturers exceed
these standards. All "race" fluids exceed these
standards. A DOT 3 or 4 fluid is really all you need
for street performance driving. Currently their are
three standards based on boiling points and fluid type.
DOT 3, DOT 4 are for Poly glycol ether based fluids, DOT
5.1 is for fluids based with Polyalkylene Glycol
Ether) and DOT 5 is for Silicone based fluids.
DRY BOILING POINT: The temperatures that brake fluid
will boil with no water present in the system.
WET BOILING POINT: The minimum temperatures that
brake fluids will begin to boil when the brake system contains
3% water by volume of the system.
The following chart shows the boiling points:
| Fluid
Spec. |
Type |
Dry
Boiling Point
|
Wet
Boiling Point
|
| DOT
3 |
Poly
glycol ether |
401ºF
|
284º
F
|
| DOT
4 |
Poly
glycol ether |
446º
F
|
311º
F
|
| DOT
5 |
Silicone |
500º
F
|
356º
F
|
| DOT
5.1 |
Polyalkylene
glycol ether |
518º
F
|
375º
F
|
|
|
|
|
Brake
Pad Basics
The GT Rotors and Drums can be used with any pad type,
however we've found semi-metallic pads to perform the best
for all around street performance.
Organic pads are typically made with cellulose and
kevlar, fiberglass or mineral filler material (used to be
asbestos). The cellulose is held together with a phenolic
resin binder which is a heat resistant thermosetting resin.
Organic pads have a good coefficient of friction for a light
pedal effort, and work well at low temperatures. They are
also quiet and do not wear the rotor or drum as much as
metallic pads.. They do not work so good for high performance
use as they quickly wear, fade, oxidize and crumble.
Semi-Metallic pads have some powdered metal added
to the mix to help stabilize the coefficient of friction
at higher temperatures. Typically powdered brass, iron or
bronze is added. Chopped brass or bronze wire is sometimes
added to help give the pad more mechanical strength. Most
stock pads on newer car are semi-metallic. Usually these
pads are excellent for all-around use. They can run the
gamut from very little metal to almost all metal. The more
metal usually means better high temp properties, more noise,
more rotor wear and less effective cold braking. Carbon
powdered is added to "carbon-metallic" pads to
further improve high temperature properties.
Full metallic pads are made of sintered metal with
very little binder. Sintered metal is powdered metal that
is pressed into a mold at high temperatures until it becomes
a more or less homogeneous piece. Pads of this type are
pretty aggressive with ones made of brass, bronze or copper
or a mix of metals being more streetable and ones using
iron being more high temperature oriented. For very high
temperature use, ceramic powder is added to the pad material.
Full metal pads are noisy, dont grip when cold or wet and
chew up rotors pretty fast.
|
|
|


