| Turn
to Page: 1
| 2 |
 11)
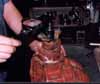
Once the springs are in, set the other driver down, lining up the corresponding
spring holes, and then the side gear and finally the thrust washer. The
other half of the case can now be placed on top. 11)
Once the springs are in, set the other driver down, lining up the corresponding
spring holes, and then the side gear and finally the thrust washer. The
other half of the case can now be placed on top. |
 12)
With the completed case set aside for now, a new pinion seal is tapped
into the housing 12)
With the completed case set aside for now, a new pinion seal is tapped
into the housing
|
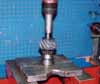 13)
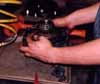
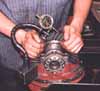
Back to the press for a new pinion bearing and crush sleeve. 13)
Back to the press for a new pinion bearing and crush sleeve.
|
 14)
The pinion housing is lowered on to the housing. Eric recommends using
the original pinion depth shim to begin with; it can be changed once the
backlash is measured. A new crush sleeve
is mandatory. 14)
The pinion housing is lowered on to the housing. Eric recommends using
the original pinion depth shim to begin with; it can be changed once the
backlash is measured. A new crush sleeve
is mandatory. |
 15)
An impact wrench must be used to snug up the pinion nut. This ensures
the proper crush is achieved on the crush sleeve. It takes approximately
250 lb-ft.. of torque to crush the sleeve properly. 15)
An impact wrench must be used to snug up the pinion nut. This ensures
the proper crush is achieved on the crush sleeve. It takes approximately
250 lb-ft.. of torque to crush the sleeve properly. |
 16)
Proper crush is determined by measuring the rolling resistance of the
pinion. If using a new pinion bearing the resistance should measure 12-14
lb-in. (6-7 in.lbs. for a used bearing.) 16)
Proper crush is determined by measuring the rolling resistance of the
pinion. If using a new pinion bearing the resistance should measure 12-14
lb-in. (6-7 in.lbs. for a used bearing.) |
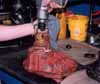
 17)
The new ring gear is bolted to the case, using Red Loctite and torque
to 60 lb.ft. 17)
The new ring gear is bolted to the case, using Red Loctite and torque
to 60 lb.ft. |
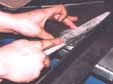 18)
Flat file the side adjusters to remove any burrs or high spots. 18)
Flat file the side adjusters to remove any burrs or high spots. |
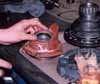
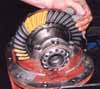
 19)Place
the differential into the case, and torque the bearing caps to 60 ft lbs.
Be sure to place the caps on the side they came off of. 19)Place
the differential into the case, and torque the bearing caps to 60 ft lbs.
Be sure to place the caps on the side they came off of. |
20)
Use a spanner to tighten the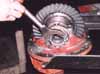 bearing adjusters. Snug them up evenly for now, they'll need to be adjusted
to set the gear backlash.
bearing adjusters. Snug them up evenly for now, they'll need to be adjusted
to set the gear backlash. |
 21)
The backlash between the ring and pinion is set using a dial indicator.
Set the pointer against the ring gear. Force the ring gear back and forth
against the bearings. A new gearset requires 6-10 thousandths, a used
one can go with 12-16 thousandths. 21)
The backlash between the ring and pinion is set using a dial indicator.
Set the pointer against the ring gear. Force the ring gear back and forth
against the bearings. A new gearset requires 6-10 thousandths, a used
one can go with 12-16 thousandths. |
 22)
After the backlash is set, the final adjustment is setting the pinion
depth. Mark the ring gear with some marking paint, and rotate the spin
the gears. 22)
After the backlash is set, the final adjustment is setting the pinion
depth. Mark the ring gear with some marking paint, and rotate the spin
the gears. |
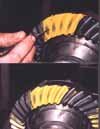 23)
The top photo shows the correct pattern, where the pinion teeth mesh in
the center of the ring gear teeth. In the bottom photo the pattern is
a bit shallow (towards the outside of the ring tooth.) To move the pattern
inward, use a thicker pinion depth shim. To move it out, use a thicker
shim (see box 14). 23)
The top photo shows the correct pattern, where the pinion teeth mesh in
the center of the ring gear teeth. In the bottom photo the pattern is
a bit shallow (towards the outside of the ring tooth.) To move the pattern
inward, use a thicker pinion depth shim. To move it out, use a thicker
shim (see box 14).
|
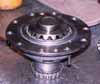
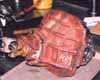 24)
The finished pumpkin, ready for paint. We recommend installing it with
a thick bead of silicone rather than the stock paper gasket. Also, in
place of the copper crush washers and stock nuts, we used new flat washers,
lock washers, and grade 8 nuts.
24)
The finished pumpkin, ready for paint. We recommend installing it with
a thick bead of silicone rather than the stock paper gasket. Also, in
place of the copper crush washers and stock nuts, we used new flat washers,
lock washers, and grade 8 nuts.
Fill the case with 75W-140 gear oil. Any thinner and you'll hear more
noise of the locker ratcheting.
Break in the gear set by driving for 15 to 20 minutes and then letting
the differential cool completely and then replace the gear oil after
the first few hundred miles.
|
Results:
Our 1967 Mustang is predominantly a quarter-mile machine. Therefore the
measure of success for us is whether or not it drops our sixty-foot times
and ET's?
Well it certainly met that criteria. With our open differential we'd knock
of 1.90-2.0 60fts, with the tires breaking loose in first, second, and
sometimes third gear. With the Lockright we ran 1.80's all day long, with
1.70's on clutch frying 5500rpm launches. Our ET's went from 13.30's to
13.0's as a result of the drop in 60 ft. times.
Road Test: The Lockright will take some getting use to for daily driving.
You'll feel and hear the mechanism ratchet in and out. Bottom line is
that if you plan to make a lot of u-turns, stick with an open. If you
want ultimate traction for the street and strip, the Lockright is the
solution. F/M |
|
|


